Tutorial – Installing Windows 10 64-bit on 2007 iMac 7.1
Introduction
Following the release of Windows 10, Apple has also updated their Windows 10 support via BootCamp v6. See here: https://support.apple.com/en-us/HT204990
Essentially BootCamp allows Windows to be installed on another partition (called the BootCamp partition) on the same Mac hard drive (or SSD); this allows the user to easily dual boot the Mac between MacOS and Windows. While BootCamp 6 is great for those people who are lucky enough to buy or own any Mac later than 2012, it is not so useful for people like me who are still using older desktop such as the 24″ iMac 2007.
For the iMac 2007, the BootCamp support stops at version 4. Apple officially supports Windows 7 32bit running on a bootcamp partition. Many people have installed Windows 7 32bit onto the iMac 2007 and many people have also successfully upgraded this to Windows 8.1 32bit. Apple says the iMac only can run up to Windows 7 32-bit. So running anything beyond this means you are on your own when it comes to having issues. Unfortunately a 32bit OS cannot take full advantage of the 4GB of ram and a 64bit OS is required.
iMac 2007 – 8 year-old technology that is just as good in year 2015

This is the iMac 2007 spec just in case anyone is not aware:
- 2.4GHz Intel Core 2 Duo
- Max 4GB DDR2 SDRAM PC2-5300
- 1920 x 1200 TFT screen
- ATI Radeon 2600 Pro with 256MB GDDR3 memory (The 20″ iMac with 2.0Ghz Core 2 Duo has a slightly slower ATI Radeon HD 2400 XT with 128MB of GDDR3 memory)

The 24″ iMac 2007 is an 8 year old desktop and most people would deem this as a dinosaur in today’s context. I think the iMac 2007 is a reliable machine and still looks gorgeous by today’s standard and it will be great to be able to extend its life for a few more years. Windows 8.1 and Windows 10 is known to run well on older hardware. In fact Windows 10 with its “Compact OS” feature have an even smaller footprint than Windows 8.1. Wouldn’t it be great if we can install Windows 10 on the iMac to make it even more useful? And while we are at it, why not make this a 64bit install too. These days it does not make a lot of sense to use a 32bit OS unless we are dealing with really really old hardware with 2GB ram or less.
I have had Yosemite installed on my 24″ iMac but find that it has been giving me random reboot from time to time. It is completely random and very frustrating. A quick search on Google suggest that I am not alone in this. It is unfortunate that a supposedly stable OS based on the Mach kernel can be so sentimental at times. So in the meantime I have downgraded to Maverick to enjoy a more stable environment. So this article is written with the main aim to dual boot Maverick and Windows 10 64bit. El Capitan has just been released and I will be trying that in place of Maverick.
If the install is not successful, well at least I have tried and failed. But I am pleased to say that all seems to go well. I am happy with the result. The iMac is no speed demon but if you are not into gaming, I think Windows 10 performance on the iMac 2007 is pretty snappy. Here is how I did it.
Disclaimer
This tutorial is made with MacOS Maverick in mind and given this, I am not sure if this tutorial will work with Yosemite or the upcoming El Capitan. However, I really don’t see any reason why not. This tutorial assume that you have some basic knowledge of how to work on a command prompt, etc. It is also assumed that your MAC is physically connected to your Windows PC via Ethernet or wireless because we need to share files at a certain point. Please note that you will be taking your own risk to do this install and please do a backup first before you do anything.
I have not used Boot Camp Assistant throughout this tutorial because I have not found that it is necessary to do so. Before I discovered this method, I was mucking around with editing Boot Camp Assistant and installing Windows 7 first and then installing Windows 10 over the partition. The process is lengthy and simply just too tedious for me.
Step 1 – Creating a Bootable Windows 10 64bit DVD
It is assumed that Maverick is already installed on the Mac and that you have a PC with Windows handy. We need to create a bootable DVD using Windows. It is possible to do the same on the Mac but I think it is a lot easier to do this on a Windows box.
Windows 10 64bit ISO can be downloaded by running the Microsoft Media Creation Tool on a Windows 7/8/8.1 machine. More information is located here. http://www.microsoft.com/en-us/software-download/windows10. In a nutshell, you just run the Media Creation Tool and it will download the ISO for you. Don’t use it to create a bootable USB because we don’t need a bootable USB for this tutorial. Don’t burn this to a bootable DVD either…at least not yet. We will need to post-processed the Windows 10 ISO before doing so.
Now that you have downloaded the Windows 10 64bit ISO and saved this somewhere, we need to tweak/remaster the ISO using Microsoft’s OSCDIMG tool. You can find more info about the OSCDIMG tool here – https://technet.microsoft.com/en-us/library/cc749036(WS.10).aspx. Download this tool to a temporary folder.
Why is this necessary? Well…if you don’t remaster the Windows 10 ISO at this stage, chances are that you won’t get pass the “Select CD-ROM Boot Type” issue. This error will pop up when you try to boot the iMac from the stock Windows 10 DVD and this looks like this:
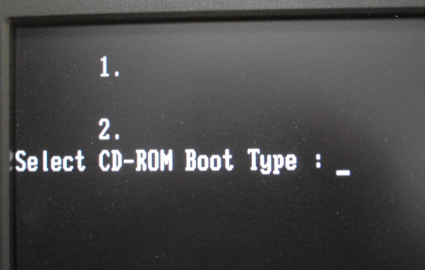
The trouble with the above error is that the keyboard is being locked out and you can’t press any key. So we need to customize the install DVD. This sounds very complex but is actually very simple. The way to remaster the Windows 10 64bit ISO is this:
- Create a temporary folder say C:\WIN1064 with the intent to hold the content to this ISO. Try to keep the name short and without spaces. It is easier to deal with short names in a command line later.
- On Windows, double click the Windows 10 64bit ISO to mount this ISO (or you can use any other software you prefer, such as 7-ZIP). Copy all the content and dump the whole lot to C:\WIN1064 folder. Remember to preserve all the sub-folders and the like.
- Move the OSCDIMG.exe file you have downloaded earlier to another temporary folder such as C:\TEMP folder.
- Start a windows command prompt with Administration rights. Change the directory to C:\TEMP folder.
- Issue this command “c:\temp\oscdimg.exe -n -m -b”c:\WIN1064\boot\etfsboot.com” “c:\WIN1064” “c:\temp\win1064.iso”.
This will create a remastered ISO of Windows 10 64bit located in the folder C:\temp. Now use a CD writing software such as InfraRecorder to burn this ISO to a DVD. If all things go smoothly, you should now have a bootable Windows 10 64bit remastered DVD. We are now done with the PC and can now shift our attention to the Mac.
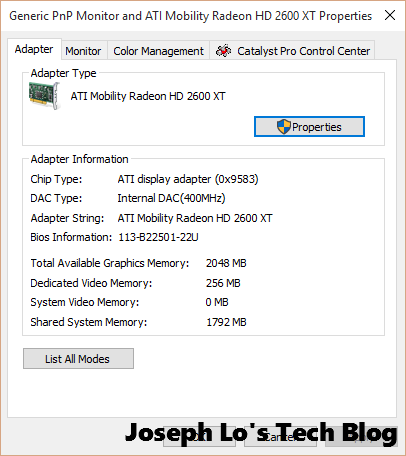
Step 2 – Finding out iMac’s graphics display engine
Boot the iMac. We need to do some data gathering on the kind of graphics hardware the iMac has.
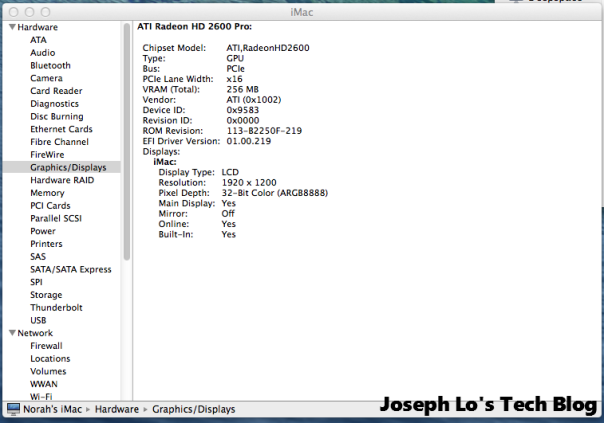
The above info tells us that the GPU is an ATI Radeon 2600 Pro with 256MB ram. This is a very important piece of info.
Step 3 – Partitioning the iMac
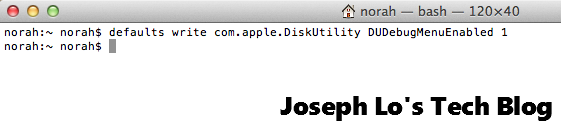
We need to be aware of the ways OSX manage the drive partitions. There are some partitions which are intended to be hidden from view. The Mac Disk Utility is capable of viewing these partitions but we need to first tweak its settings. This is what we need to do. First make sure that disk utility is not open. Quit Disk Utility if have to. Open a terminal and type in this command in one line.
defaults write com.apple.DiskUtility DUDebugMenuEnabled 1
The terminal window will look somewhat like this:
To disable this function, just start Terminal again and key in this line.
defaults write com.apple.DiskUtility DUDebugMenuEnabled 0
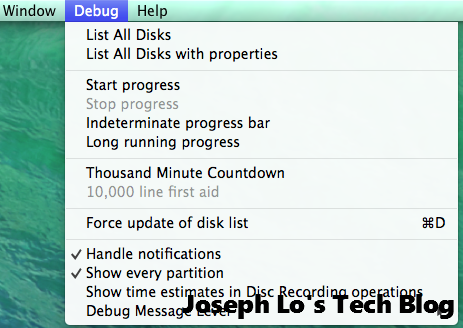
Now start Disk Utility and make sure that the “Show every partition” setting is enabled as follows:
I have previously replaced the hard drive to my iMac 2007 with a new 240GB Kingston HyperX SSD. My main OSX Maverick partition is 75GB (for now) and I have the remaining 165GB partition intended for El Capitan in future.
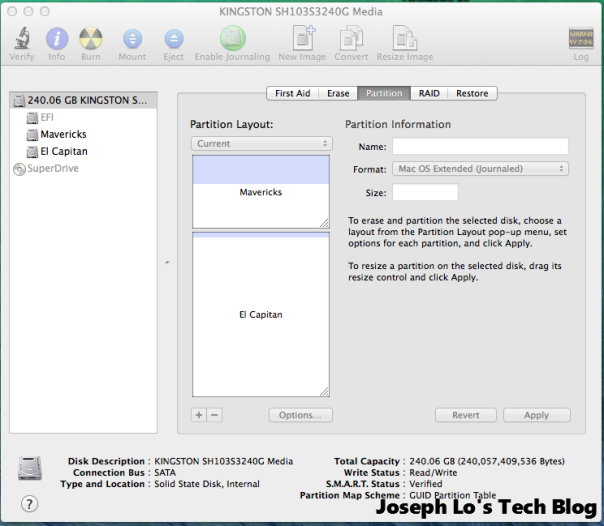
The above is how my partitions look like before prepping the system for windows 10. It can also be observed that there is a hidden EFI partition that is otherwise not visible. It is important to note that I have a very simple partitioning scheme on my iMac. So if you have a complicated setup, then this tutorial may or may not work for you. Ideally I would like to reserve at least 128GB for Windows 10 but I will use 100GB for now. Usually I will create a Windows OS partition + a Data partition on my PC boxes but I decided that I am going to just keep things simple for now. So the OS + Data go onto one big partition at this stage. I have most of my data stored on a NAS anyway so this is not a problem for me.
Now we need to create a partition suitable for Windows 10. There are 2 ways to partition a drive: via MBR (Master Boot Record) or via GPT (GUID Partition Table). Wikipedia has more information here:
To put it simply, MBR is a legacy standard that was introduced since the early IBM PC DOS days. MBR is limited to a maximum of 4 primary partitions. To create more partition, we will have to resort to more creative ways such as setting the 4th partition as the extended partition so that we can create logical drives (sub-partitions) within the extended partition. It is a limited system. The GPT scheme is the way forward.
Just a note here: Windows 7 can only be installed on a MBR partition but it’s data drivers can be located on GPT partitions. Windows 8.1 64 bit can be installed to a GPT but the system must support UEFI.
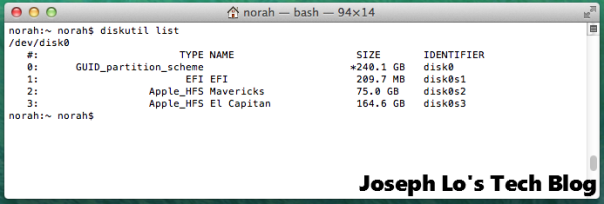
On the Mac, launch Terminal and type “diskutil list” to list all the partitions visible to MacOS.
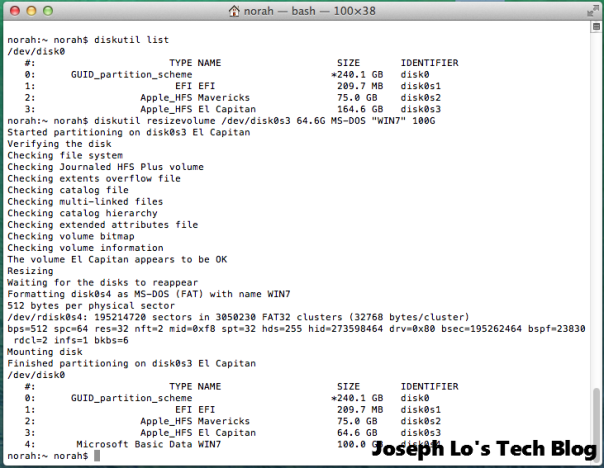
What I did next is to resize my El Capitan partition to 64.6GB and make way for a new 100GB partition for Windows 10.
The command line to do this is
diskutil resizevolume /dev/disk0s3 64.6G MS-DOS “WIN7” 100G
Obviously the partition name and disk size will be different between different users.
Graphically, Disk Utility will show something like this:
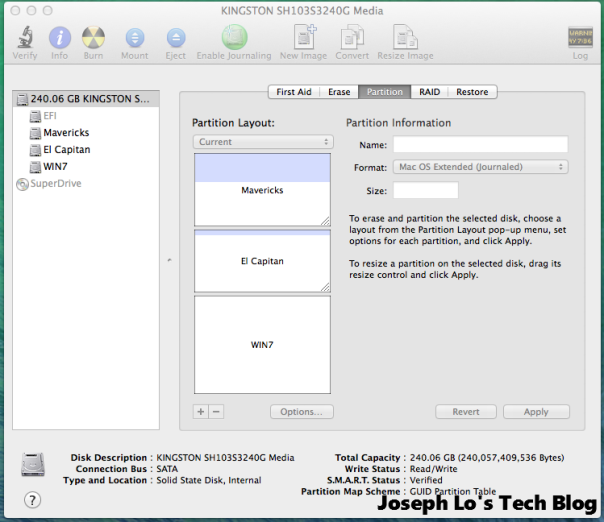
Now that we have created a new Win7 partition, we can proceed to install Windows 10.
Step 4 – Installing Windows 10
Insert the Windows 10 64bit boot DVD into the iMac and reboot the Mac. Once the famous Mac boot tone is heard, press the Option key. We should now see a Windows DVD icon next to the Maverick one like so.
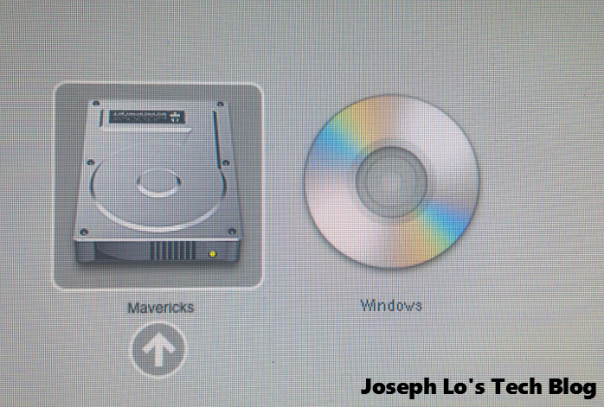
This will allow us to select whether we are going to boot from the SSD or to boot from the DVD. Select the Windows DVD. Windows 10 will now boot and we should now see the Windows 10 logo on the screen. Be aware that the boot process takes a long time so while it may appear that the system has hung, it is not. It is just very slow. After about a minute or 2 later, we will now see the first setup screen.
Follow the prompt until we are at this screen where Windows prompt us whether we should do an Upgrade Install or a Custom Install. Select Custom: Install Windows Only (Advanced).
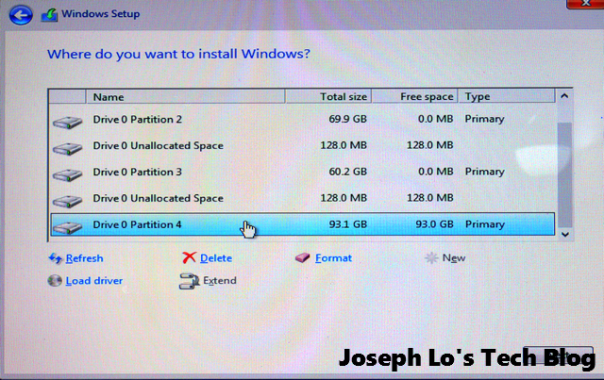
This will quickly bring us to the Windows partition screen.
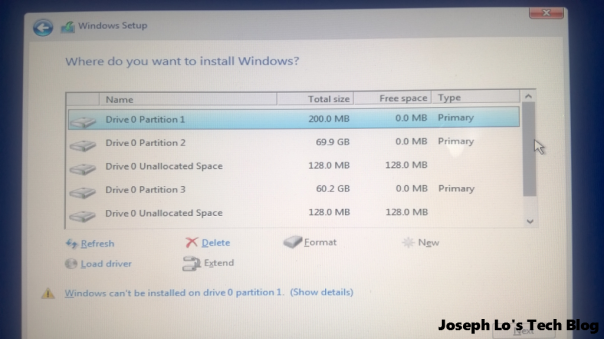
Some quick observations:
- There are now 4 primary partitions:
- Disk0 Partition 1 which is the Mac EFI partition (200MB).
- Disk0 Partition 2 which is the Mac Maverick partition (69.9GB).
- Disk0 partition 3 which is the Mac El Capitan partition (60.2GB).
- Disk0 partition 4 which is the newly created windows partition (93.1GB)
- Windows also created a boot partition which is 128MB.
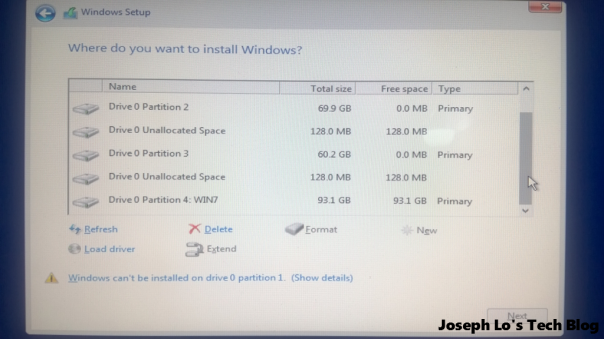
We wanted to install Windows 10 on Disk0 Partition 4 but Windows will state the following error message “Windows can’t be installed on Drive 0 Partition 4.”
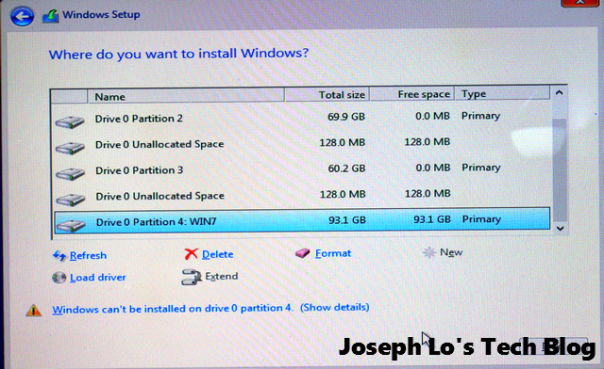
Ignore this and while this partition is selected, click “Format” and format the partition. When the format is done, the error message will go away and Windows 10 can proceed to installing normally.
From hereon, the installation is typical of any Windows 10 PC install.
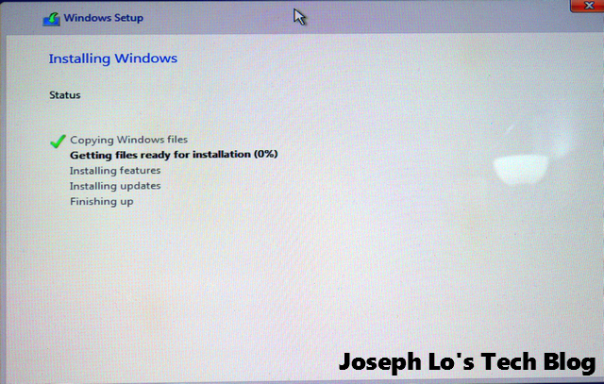
At some stage of the installation, Windows 10 will automatically reboot. This is fine. No need to press the Option key as it is smart enough to know that it should boot from its own windows partition. In fact, I observed that Windows 10 rebooted twice in total before it shows the screen prompting for a product key. Enter the product key accordingly.
Next it will ask if we should customize the settings or use express settings. I select custom settings and I highly recommended that this be selected. See here for more information of what to enable and what to disable. http://www.howtogeek.com/224352/what%E2%80%99s-the-difference-between-windows-10%E2%80%99s-express-or-custom-setup/
Once this is done, Windows 10 will again reboot and proceed with the install. Follow the prompt accordingly as Windows prompt for login account, etc. When the install is finished, Windows 10 will boot to a desktop. This is how it looks on my Mac.
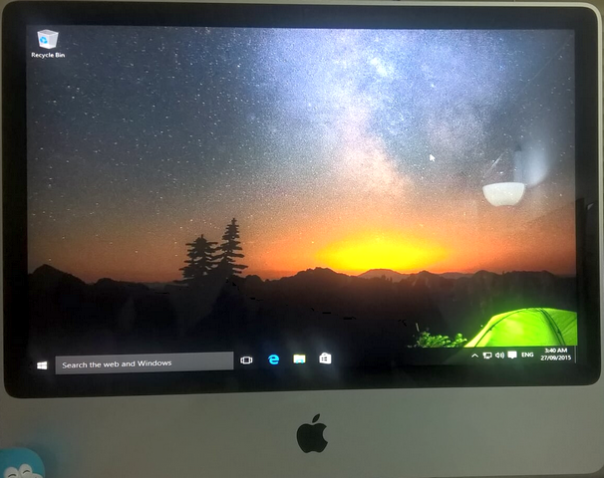
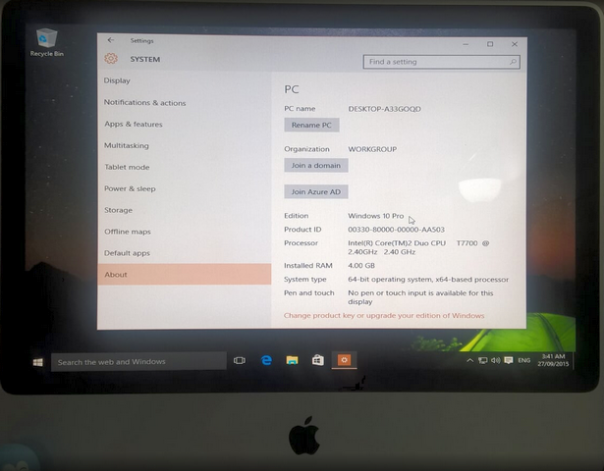
Peeking under the hoot shows this:
Viola! We have now successfully installed Windows 10 64bit on an 8 year old Mac.
Step 5 – Windows Drivers
The first observation with Windows 10 on the iMac is that the screen resolution is not the optimum 1920 x 1200. If we leave Windows 10 running for about 5 mins after its first boot, it will automatically change the screen resolution to the correct 1920 x 1200. Unfortunately, Windows 10 will in the process select the wrong graphics driver.
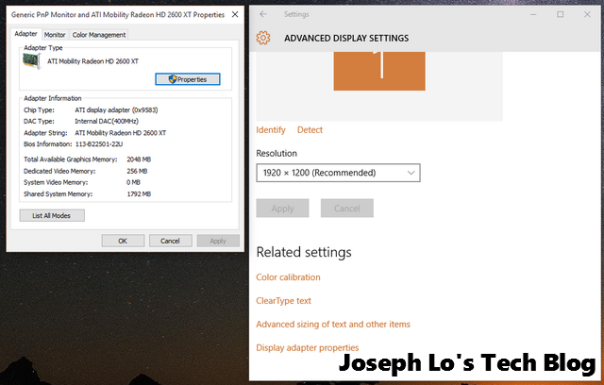
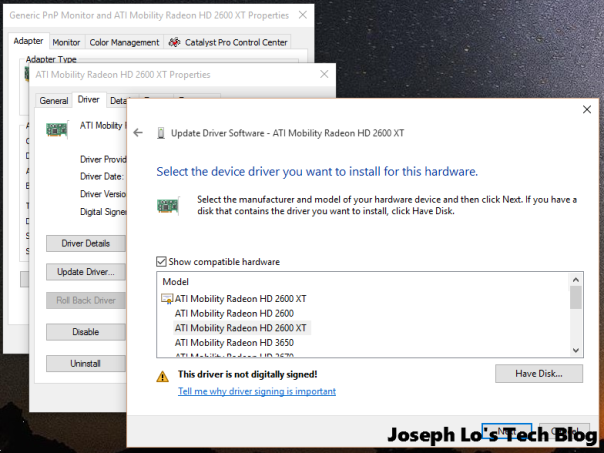
The above screenshot shows that Windows 10 has detected the display card as an ATI Mobility Radeon HD 2600 XT. The iMac 2007 has an ATI Radeon 2600 Pro with 256MB GDDR3 memory. Why is this significant? Because with the incorrect driver, Windows 10 will hard crash from time to time and this can be reproduced each time easily when we drive the card hard such as playing a youtube video for instance. This gets so bad that it is almost impossible to use the iMac for any length of time.
The blue screen of death looks like the following:

A closer look will find that it is the ATI driver that is causing the crash. Hint: look at the atikmpag.sys error above. This is in fact the hardest part in this tutorial to deal with. It takes several trials and errors to hit the right note and even with this tutorial, I don’t expect it will be a smooth sailing for everyone.
Step 6 – Display Card Hardware IDs
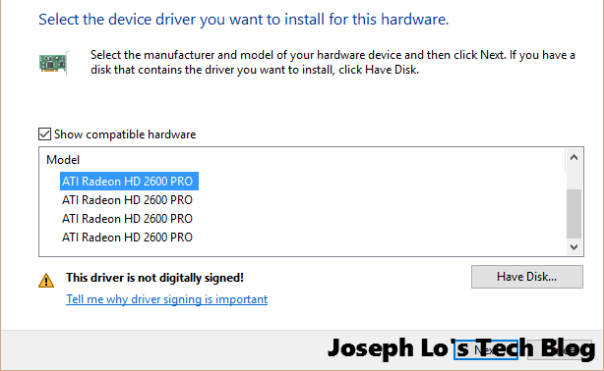
I have tried to force Windows 10 to use the correct display driver that comes as part of the OS but I don’t have much success with this approach. The closest device driver that come with Windows 10 for the ATI Radeon 2600 Pro is the ATI Radeon HD2600 Pro.
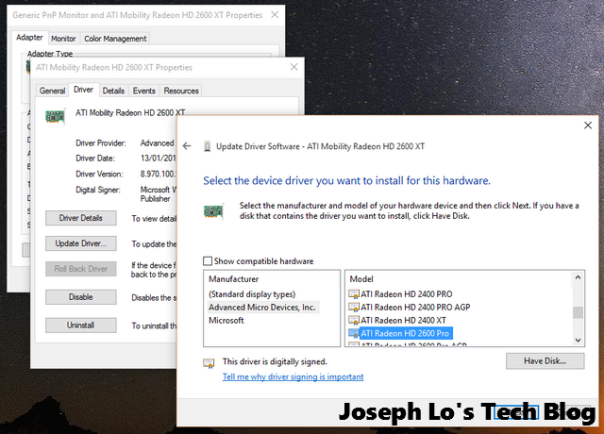
However, Windows 10 will not install this driver and will throw the following error:
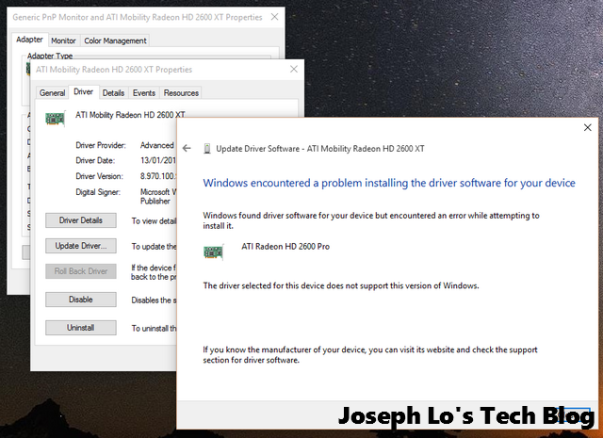
We don’t have any other options other than to modify the video driver.
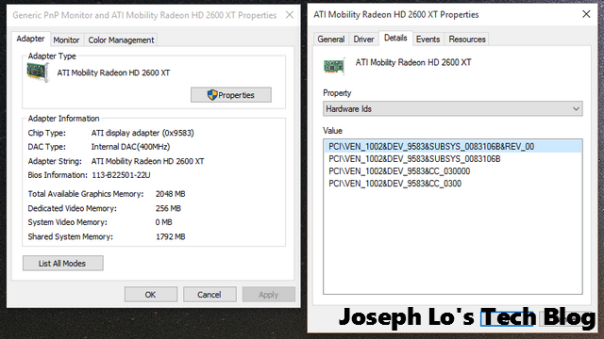
But first we need to gather some forensic data from Windows 10 on the iMac. Go to Display driver properties, hit the “properties” button. This will open up another windows. Navigate to the “Details” tab and in the dropdown menu, select “Hardware Ids” as shown below.
Microsoft has some good info what exactly are “Hardware Ids”. See here. https://msdn.microsoft.com/en-us/library/windows/hardware/ff546152%28v=vs.85%29.aspx?f=255&MSPPError=-2147217396. In a nutshell, a hardware ID is an identification string defined by a manufacturer so that Windows can use this information and pair the hardware device to a device driver INF file. So in our case, there is a mismatch between the physical hardware and the device driver and hence the crash.
We can see that there are 4 hardware Ids as reported by Windows 10. These hardware IDs resemble one another, sort of in a way. There are clearly some patterns here:
- The first string is the longest and contain the most amount of information. The other strings appear to be a subset of the first string.
- The second string is almost identical to the first except that the string truncated the revision number at the end. The fourth string is also almost identical to the third except missing 2 x zeros at the end.
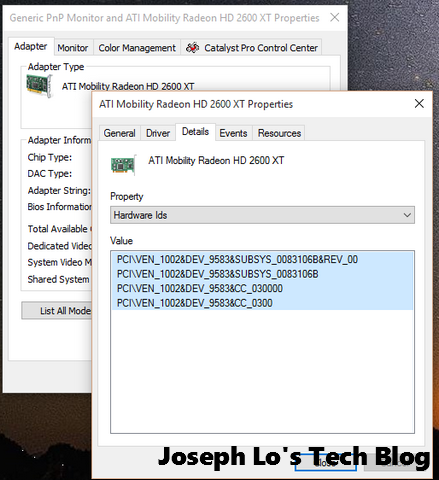
So what we need to do now is to select these 4 hardware IDs by highlighting these 4 lines and right click the mouse to copy. Copy and paste these lines into a temporary text file so that we can get to these later.
We now need to install the latest video driver.
Step 7 – Installing the latest Video Driver
This tutorial is using Windows 10 64 bit so we obviously will only use 64 bit drivers. Browse to AMD’s website: http://support.amd.com/en-us/download
The display card is an old card and is considered a legacy device.
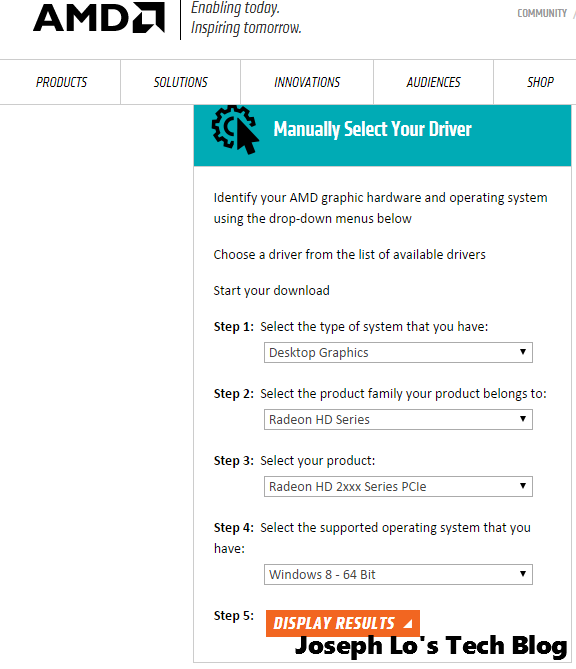
AMD has yet to update their older device drivers to Windows 10 64bit so drivers compatible with Windows 8 64bit is the next best thing. Click “Display Results” and we will see:
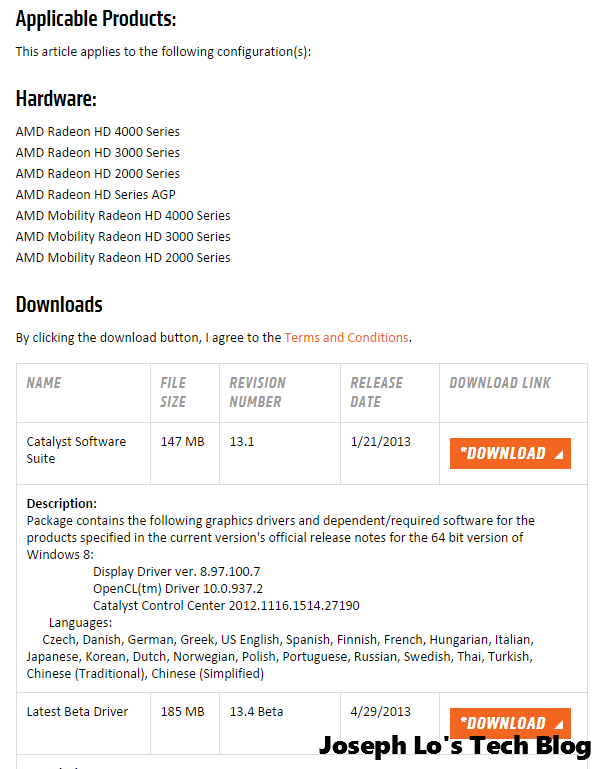
Download the catalyst software suite v13.1 from the above link.
Before we install this, we need to disable Windows 10 64 bit’s driver signature enforcement. This is unique only to 64 bit OS and this step is not required for 32 bit Windows.
Here is a helpful guide how to disable Windows 10’s driver signature enforcement.
So the steps to do this are:
- Select “Restart” from the Power options menu and hold down the Shift key and click restart
- Once computer is booted, select Troubleshoot option -> Advanced Options -> Startup Settings. There will be a startup button there. Hit the startup button and the iMac will reboot.
- After the iMac is rebooted, a list of startup settings will then show up. Press the F7 key (or the “7” number key) to disable driver signature enforcement.
- The iMac will once again reboot.
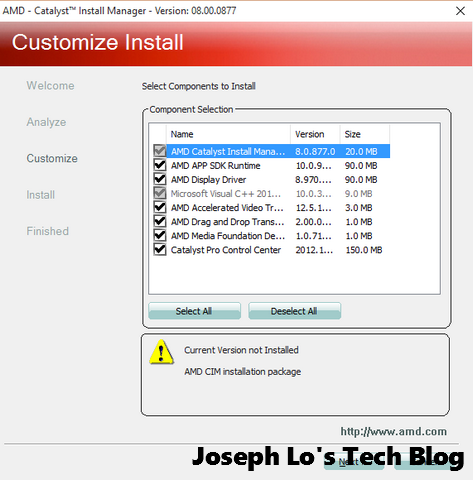
Now install the AMD Catalyst Software. I select Custom Install so at least I have a slight knowledge of what components will be installed to Windows.
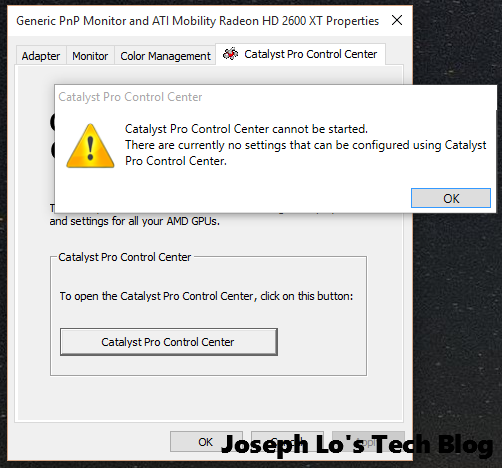
When the install is finished, navigating to the video device driver properties window will now show a new “Catalyst Pro Control Center” tab. See the following screenshot:
But clicking this will show an error like so:
Now we have to patch the video driver.
Step 8 – Patching the Video Driver
- Go to Display Driver Properties -> Properties -> Detail -> INF Section. Observe the string that is being shown. On my iMac this is “ati2mtag_M76”.

2. Use Windows Explorer to navigate to this directory: “c:\AMD\Support\13-1-legacy_vista_win7_win8_64_dd_ccc\Packages\Drivers\Display\W86A_INF” as shown here.
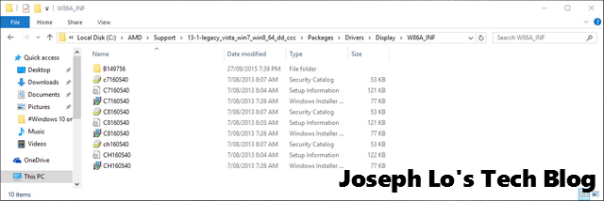
The files are generally named like so:
- C7 series with names such as C7160540, etc
- C8 series with names such as C8160540, etc
- CH series with names such as CH160540, etc.
There is a significance to how these files are named. The CH ones are device drivers for Windows Vista. The C7 ones are for Windows 7 and C8 ones are for Windows 8. We are going to patch the C8 drivers. So before we do any damage to these files, let us back these up to another folder. Quite an important step in case we make a unrecoverable error here.
There are 3 off C8 series files. These are:
- C8160540.cat
- C8160540.inf
- C8160540.msi
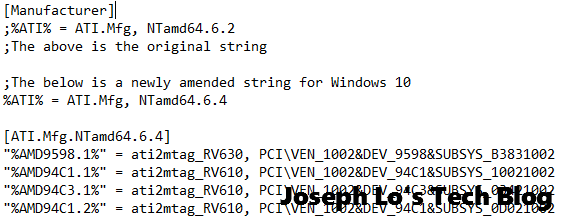
Peeking inside the C8160540.inf file, we will see all the definitions of video drivers. If we look closer, we will find strings such as
[Manufacturer]
%ATI% = ATI.Mfg, NTamd64.6.2
The notable part in the above string is the last digits “6.2“. This is the “version strings” that identify the version of Windows NT. The Windows NT version strings are as follows:
- NT 5.0 = Windows 2000
- NT 5.1 = Windows XP
- NT 6.0 = Windows Vista
- NT 6.1 = Windows 7
- NT 6.2 = Windows 8
- NT 6.3 = Windows 8.1
- NT 6.4 = Windows 10
So what we will do is to change the above string to:
%ATI% = ATI.Mfg, NTamd64.6.4
So that Windows 10 can recognize this as a valid device driver. I edited this [Manufacturer] section as follows:
[Manufacturer]
;%ATI% = ATI.Mfg, NTamd64.6.2
;The above is the original string

;The below is a newly amended string for Windows 10
%ATI% = ATI.Mfg, NTamd64.6.4
Now we know from Windows 10 that the INF section is relevant to the video driver is:
"ati2mtag_M76".
Next we are going to change the section identifier from
[ATI.Mfg.NTamd64.6.2]
to
[ATI.Mfg.NTamd64.6.4]
The amended section now looks like this:
Next we are going to scroll all the way down in this INF file. The goal is to find a “localizable” string that reads something like “ATI Radeon HD 2600 Pro” or something similar. This section looks something like the following:
Scrolling towards the end of the file, we will come to this line, which is what we want:
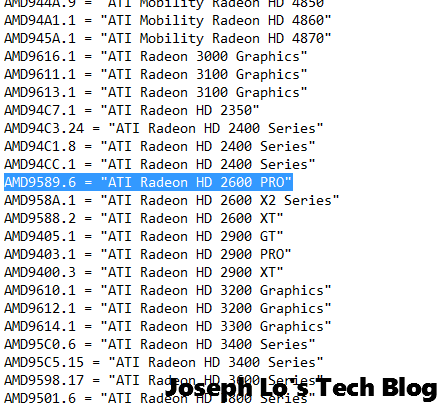
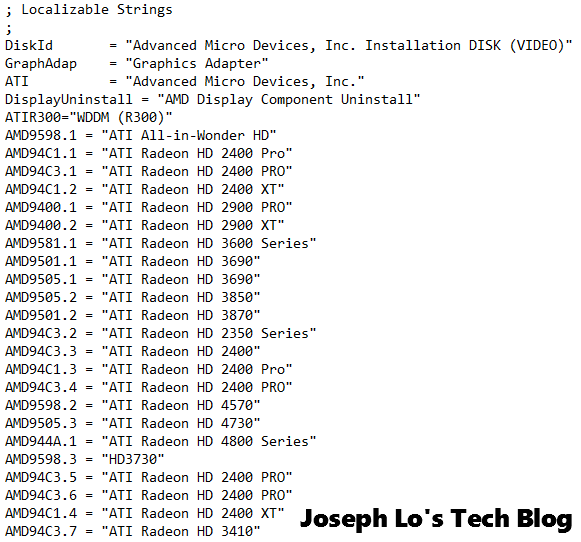
Note that this string has an identifier “AMD9589.6”. Now do a search for this string and we will quickly come to this line:
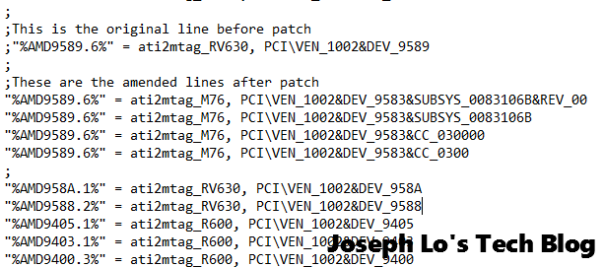
Now amend this line to read as follows:
Now go to Display Properties and update the driver. When it prompt for a driver, click the “Have Disk” button and point to the folder c:\AMD\Support\13-1-legacy_vista_win7_win8_64_dd_ccc\Packages\Drivers\Display\W86A_INF” folder.
Select the file C8160540.INF. Windows 10 will display several compatible drivers like so:
Theoretically all 4 drivers should be the same so choose the first one to see if this works. Windows 10 will complain about unsigned drivers. Ignore this and proceed. Windows will go blank for a few times while the new driver is loaded. This is normal. Display Properties will now show the following:
We are now done!!
This sounds complicated but it is really not. To recap, we only need to do these:
- Find out from Windows Properties what is the “INF Section” string. In my case it is “ati2mtag_M76”
- Amend the C8XXXX.inf to change the NT version string from 6.2 to 6.4
- From within the C8XXXX.inf file, scroll down near to the end of the file to locate the localizable string “ATI Radeon HD 2600 PRO”. In my case my line reads: AMD9589.6 = “ATI Radeon HD 2600 PRO”
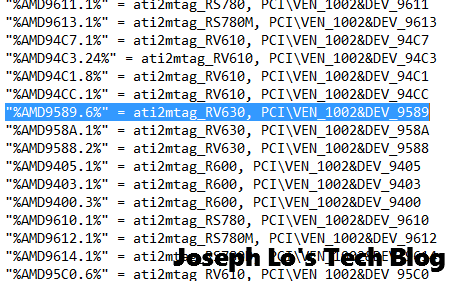
- Take note of the first part of this string and search for this string “AMD9589.6” within the file. We will be able to locate this line which in my case reads: “%AMD9589.6%” = ati2mtag_RV630, PCI\VEN_1002&DEV_9589
- Amend the above lines. Refer earlier texts for more info.
- Update the driver in Device Properties and viola we are done.
To verify if this works, load a youtube video and see if this cause the iMac to crash. In my case, Windows 10 appear to be stable. Fingers crossed. Note that AMD’s Catalyst Pro Control Center will not work immediately after the device driver is installed. We need to do a reboot first. Catalyst Pro will work after the reboot.
Step 9 – What works and what don’t
What worked out of the box:
- Sound
- Wifi
- Networking
In fact almost everything works. See the following device manager screenshot:

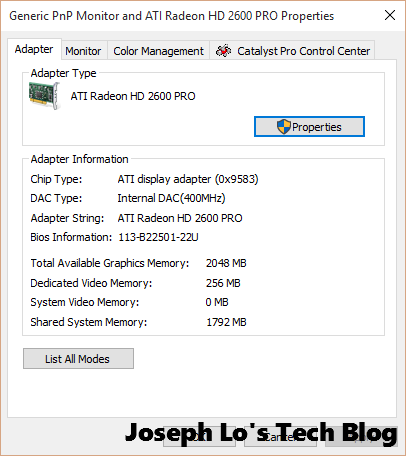
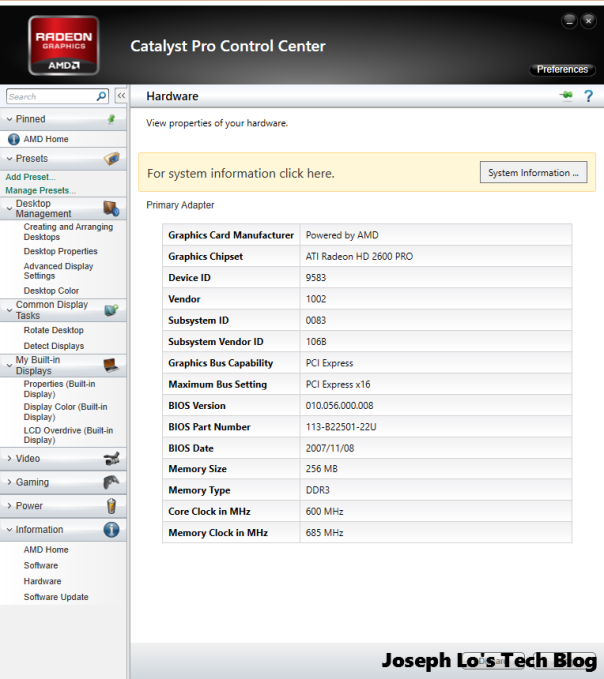
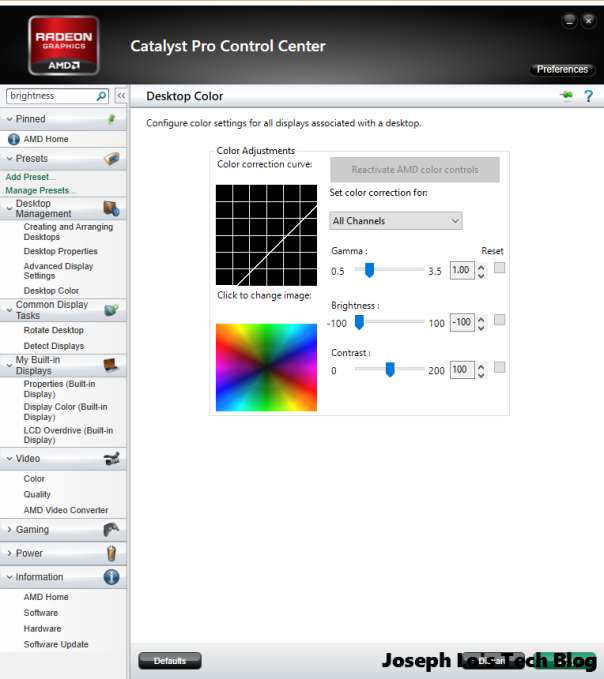
Catalyst Pro reported the video hardware as follows:
One of the first thing I did after Catalyst Pro is up and running is to change the screen brightness. The iMac’s screen is so bright that it actually hurts my eyes. I tune the setting all the way down. I overdid the settings by tuning the brightness all the way down to -100. I think -50 works well for me.
What don’t work (or buggy)
- Webcam
Bluetooth- Some keys in the Apple Keyboard.
Step 10 and Beyond
Conclusion
Windows 10 has now been installed on my iMac for the past weeks and so far it has been stable. No crashes so far. Fingers crossed. I don’t find the iMac lagging in anyway and the experience of using Windows 10 on this aging iMac is not much different to my main desktop i5-4670 3.4GHz with 16GB ram. Windows 10 on the iMac is a good match and I would recommend this. Hope this tutorial is useful in anyway. Happy “windowing”…..
Credits and References
I cannot achieve the above without the following guides. Thanks to all the authors and contributors:
- http://www.intowindows.com/how-to-install-windows-8-1-on-mac-without-boot-camp/
- http://www.intowindows.com/how-to-create-windows-8-1-bootable-usb-on-mac/
- https://www.reddit.com/r/apple/comments/1x7p25/installing_a_64bit_version_of_windows_on/
- http://www.123myit.com/2014/02/create-bootable-windows-7-8-usb-mac/
- http://forums.macrumors.com/threads/tutorial-how-to-enable-usb-install-on-mavericks-for-unsupported-bootcamps.1680652/
- https://discussions.apple.com/thread/6095828?start=0&tstart=0
- http://www.gopulls.com/blog/2009.08.26/install-windows-7-x64-on-a-mac-beat-the-select-cd-rom-boot-type-error/
- http://www.iruberleet.org/2011/10/12/fixing-select-cd-rom-boot-type-when-installing-64bit-windows/
- http://www.nizzoli.net/post/39218060119/windows-8-on-a-mid-2007-macmini
- http://www.tomshardware.com/faq/id-2335392/manually-installing-latest-amd-catalyst-drivers-windows-vista.html
- http://www.tech-recipes.com/rx/9839/how-to-manually-partition-boot-camp-your-mac-for-windows-7/
- http://blog.thedeltaflyer.com/2013/01/dual-booting-windows-8-and-mountain-lion-natively-using-efi/
- http://twocanoes.com/support/winclone/installing-windows-via-boot-camp-on-a-large-(2.2-tb-or-larger)-drive-in-lion-(10.7)-and-later
Posted on August 9, 2015, in Computer, Computer, Hardware, Software, How-to's and tagged Apple, iMac, Microsoft, windows 10, Windows 10 64bit, Windows 10 64bit iMac 2007, Windows 10 64bit on iMac, Windows 10 on iMac. Bookmark the permalink. 65 Comments.

Hey, I don’t know if this is still relevant but I managed to get my Bluetooth to work by running the x64/applebluetoothenable.exe file from bootcamp 4.
Thanks Griff. I will try this out.
How do i go back to the iMac OS??
Hey, I have the exact same iMac as you do. I go through the same procedure to create the Windows 10 boot DVD. When I boot I get the ‘Windows’ option which I click on. Then after a few seconds of DVD activity the screen goes black with a cursor blinking at the top left. Then is just sits there.
I do the same procedure with a Windows 7 DVD and things boot and I can install Windows.
Any suggestions as to what the Windows 10 boot issue is?
Hello there. It looks to me that the OSCDIMG step wasn’t done right….otherwise you should be able to boot into Windows 10. Maybe retry that step.
Thanks for the excellent write-up, this saved me a ton of time. I am typing this from Windows 10 on my 2008 iMac 24″. My sound did not work with the Windows driver, it loaded fine on its own, but no sound was produced. An updated Realtek driver solved the problem. I also was able to get the iSight driver loaded using the AppleNullDriver64.exe from this site
http://files.geoffgarside.co.uk/bootcamp/Drivers/Apple/x64/
I haven’t had a chance to test it yet, but the driver is loaded.
Have you found a way to get the bootcamp control panel installed?
Hello Joe, glad you have success! No I haven’t been able to install the bootcamp control panel but it is not essential for me personally.
Hi Joseph….I too am having problems installing Windows 10. My iMac (mid 2007) HD died and so I had to purchase a new drive and re-install OS El Capitan. I did previously have Windows 10 running via boot camp. I made a ISO disk of Windows 10 but of course my system would start without the use of my keyboard so I was stuck with the Windows boot option screen. I created a new Windows 10 boot disc following your instructions. I used another computer that does not have a HDD. Terminal confirmed the OSCDIMG was successful. I then copied the new ISO to a USB stick and from there made a bootable disc. Now when I boot my mac and use the ALT Option key to select my boot option, the windows 10 disc is not visible. Any idea what I did wrong? Thanks
Hello Joel, hmm…I am not totally sure to be honest.
I am also not sure if you create a bootable USB drive using the OSCDIMG image that you created earlier will allow the Mac to boot properly off win10 setup. Have no idea about this one sorry. I think you may have to google to see if others have attempted to do what you are doing. Sorry could not be of more help 😦
Hi, I am following this tutorial to install Windows 10 on the same mid-2007 iMac machine. I follow all of your steps up to the point at which Windows Setup is telling me that Windows cannot be installed on the partition. However, when formatted/erased, the error does not go away. It mentions that the drive must be GPT for Windows to be installed onto it. No matter how many times I do this, it keeps happening. I have looked around, and I’m not sure if there is a way to convert the ONE partition on the mac to GPT, whilst leaving the OSX system alone.
Thanks.
(I’m looking for a quick response, I’m quite rushed, thanks)
Excellent article…
Thanks for the insight. I have been running a Mac since the 512k days and this brings back memories of some of the tweeking back through the years as Apple moved on first to a new ROM, then the PPC and now Intel hardware.
While I felt pretty comfortable with patching the older Macs, its been a learning process with the Linux like core code and structures.
The 2007 seems to run El Capitan just fine… better than previous OS versions… decided to upgrade the HDD at the same time and with your assistance hopefully will have it dual booting in no time.
Windows 10 also seems better too than Vista, Windows 8 on older PC hardware so I expect the Mac will do just fine after making the adjustments you detailed.
I am glad you like the article and thanks for your comments too 🙂
Many thanks – extremely detailed and useful article!
Thanks man!!! it worked !!!appriciate the help.
Glad this work for you 🙂
Awesome tutorial. I’d love to get this working on an older 24 inch Intel Core 2 duo White Imac…. Anyone manage to do this?
Nice tutorial
I’m stuck after using oscdimg.exe
I got a new 4.608.786 KB iso file that will not fit in a regular DVD. Something I can erase to make the file lighter??
Thanks!!
Hi again. I solved the issue using an International English iso. It was just a few KB lighter and it did fit in a regular DVD. So thanks to you i’m on W10 64 bits falls creators uptade with good performance.
I had no problem with graphic card yet, so I’m not touching this driver for the moment.
However, I have a mayor issue with WiFi. It connects but I got really slow speed (1 mbps). I downloaded Broadcom 802.11n drivers, installed them, but then I can’t connect. It says connected, no internet. Then I went back again to Microsoft driver and achieved normal speed. Everything seemed good, but after a while with regular use, it suddenly started working slow again, so I need to change to Broadcom driver and Microsoft driver again each time.
I can figure some of you have ran into the same problem. Anyone got a usable driver? I’d really appreciate any idea!
Joseph, many thanks for sharing this amazing detailed tutorial! Unfortunately I got stuck at the first command promt. I’ve got a mid 2007 20″ mac with El Capitan. Few years back added 2gb ram (now 6 in total) and swapped the hdd for a sshd. I bought Win7Pro64 iso but couldn’t get it done with BootCamp. Got stuck a 1.2.Select CD-rom Boot Type.
Now when I enter c:\temp\oscdimg.exe -n -m -b, it comes back with
ERROR: Could not open boot sector file “”
Error 3: The system cannot find the path specified.
Do have an idea how to get this solved? Thanks!
And when I enter the whole command at once it says the syntaxis of the name is incorrect:
c:\temp>”c:\temp\oscdimg.exe -n -m -b”c:\WIN0764\boot\etfsboot.com” “c:\WIN0764” “c:\temp\WIN0764.iso”
De syntaxis van de bestandsnaam, mapnaam of volumenaam is onjuist.
hi! i hope you’ll answer to my question. i got your same imac of 2007 and i installed windows 10. I installed correct gpu’s driver like you did but the monitor resolution isn’t still the correct one… i hope that you’ll help me
Excellent article – I have exactly the same video driver and managed to get the ”Pro” driver running as well. One change with the current (1709) Windows 10 is that is doesn’t show the “have disk” message quite as readily. You have to go to the Action section at the top of device manager (after clicking on the display adapter) – and then select “Add legacy hardware”.
I now have converted my old mid 2007 imac to be triple boot – OSX, Win XP and Win 10 – had to get rid of the OSX Recovery partition to avoid going over the MBR 4 partition limit.
So thank you Joseph for your painstaking efforts in documenting this method.
Hi Kim, glad this works out for you!
Hi all,
I’ve managed to get this working on an iMac Mid-2007 20-inch (with the Radeon 2600 HD Graphics with 256MB VRAM).
I also managed to get the official Boot Camp drivers installed; giving full functionality to everything!
How I did it; used Boot Camp installer in El Capitan to download the Windows 7 Boot Camp Driver set and saved that to a USB memory stick.
I performed Joseph’s steps above to create a Windows 10 Bootable ISO and performed a clean install of Windows 10.
Once booted into Windows, I opened up the USB and navigated my way to WindowsSupport -> Drivers and deleted the ATI folder.
Then navigated to WindowsSupport -> Drivers -> Apple and right clicked on BootCamp64.msi and chose Properties. From the Properties panel I clicked on the Compatibility tab and checked/ticked the option “Run this program in compatibility mode for: Previous version of Windows” then clicked Apply and then OK. The BootCamp64.msi will now think it is running in Windows 7. However it still needs to be run with Admin rights.
To run BootCamp64.msi with Admin rights, search/find the Command Prompt in your start menu and right click on it and choose “Run as Administrator” and then type the full path to you to the BootCamp 64.msi in the command prompt to launch it, for example: D:\WindowsSupport\Drivers\Apple\BootCamp64.msi
You will find the BootCamp installer will now run and install all the drivers your Mac needs excluding the ATI one we deleted earlier (if you haven’t deleted it then the Boot Camp installer will crash the entire computer trying to install the ATI Drivers).
Once installed, I have access to everything including iSIght, Bluetooth, Audio, proper Brightness control (yes actually adjusting the screen backlight) from within the Boot Camp Control Panel!
Regarding the ATI Graphics drivers, I installed the Catalyst Software that Joseph recommended (it seems later versions just refuse to install properly) without modification. Windows Update found a later version of the ATI Mobility Radeon HD 2600 XT dated from 2015 that appears to be completely stable and compatible with the Catalyst software version 13.1.
Only unusual things I’ve observed, is that the Boot Camp brightness resets when waking from Sleep (just needs to be set again) but works fine/remembers the setting on a cold boot of the OS – I’ve just set the screen to turn off instead of the computer sleeping as a workaround. Also Apple Software Update hangs looking for updated drivers when run, so I just uninstalled Apple Software Update as I doubt I will ever need it. Other than that Windows 10 works great!
The iMac has been upgraded with an SSD so it runs Windows 10 like it’s a brand new computer even though it’s over 10 years old!
Joseph, many thanks for sharing this amazing detailed tutorial! Unfortunately I got stuck at the first command promt. I’ve got a mid 2007 20″ mac with High Sierra. I have 6gb in total. I bought Win10Pro64 iso but couldn’t get it done with BootCamp. Got stuck a 1.2.Select CD-rom Boot Type.
Now when I enter c:\temp\oscdimg.exe -n -m -b, it comes back with
ERROR: Could not open boot sector file “”
Error 3: The system cannot find the path specified.
Do have an idea how to get this solved? Thanks!
here the solution: command line is “c:\temp\oscdimg.exe -n -m -bc:\WIN1064\boot\etfsboot.com c:\WIN1064 c:\temp\win1064.iso” (without quotes)
works for me
😉
Hi Michael, glad you got things working and it is great to see your workflow as well! 🙂
I am glad you sorted this one 🙂
Thanks for this great tutorial. Have been working great for months
After latest update (1803) wifi connection shows “no internet, secured”
Any suggestions??
So Microsoft overrode my request and installed Windows 10 April 2018 update when I wasn’t looking – reset the video driver and then some things won’t run (vimeo for example). So I came back here – found the hacked inf file I still had in the AMD folder and got it back to
ATI HD Radeon 2600 PRO.
And now it all works again – thanks Joseph.
Glad you resolved the issue! 🙂
Hi Joseph! I am trying to install windows 10 on my 7,1 iMac, but cannot get past a “Select boot CD” – (or something like that) – error. I tried converting a windows 10 .iso (remastering) but was not successful because it also does the same thing – gives me an error message. I was wondering if you could send me an .iso that could work booting up. If possible, I would much appreciate it. Thanks!
Sorry Danny I don’t have access to that ISO file anymore. I suggest you try to create a remastered ISO using the same procedure.
Thank you for very detailed steps. I followed all first steps but I get a message Can’t find BootMGR when I rebooted my IMac and inserted the ISO image DVD. Please help. Thanks
Hi there. I have no idea why that happens unfortunately…..
Thanks for this write up. It helped me a lot in upgrading a few 2007 iMacs.
Here is my experience with doing a fresh install that replaced Mac OS X completely.
I did not have to modify the Windows 10 ISO at all. I used the latest ISO that is Windows 10 1803 (October 2018 Update) and had no keyboard issues.
Once Windows 10 was installed most things worked on the newest branch.
WiFi was slow, but updating the drivers fixed this issue.
Bluetooth worked out of the box
Sound did not work. I had to install some Realtek drivers. Windows 10 identified the Sound as Cirris but when looking at the hardware IDs it was in fact Realtek, so updating those fixed Sound.
Like another user mentioned, by using AppleNullDriver64.exe from the Bootcamp drivers I was able to get the camera working as well.
Now everything works and is running much better than El’Capitan did. Not only that but I can use legacy software on the machine that I was unable to do with Apple!
Thanks for the assist!
Great tutorial! I recently updated my windows to the October 2018 update and the video driver reset. It now displays as Microsoft Basic Display Driver. I don’t know where to go from here. I installed the AMD Tools, but still doesn’t show in the display driver window.
As of the latest Windows 10 1903 update (May 2019), any Mac with a version of bootcamp before 6.0 will crash on login.
Because of this, the easiest and best way I’ve found to do this is to install Windows 10 64-bit using Joseph’s method, then follow the procedure outlined here: https://www.crystalidea.com/blog/bootcamp-and-windows-10-1903-may-update to download Bootcamp 6.0
To be explicit, I first downloaded 7-zip and Brigadier
Then navigated to downloads using “cd C:\Users\[username]\Downloads”
Then used the command “brigadier.exe –model iMacPro1,1” to download the version of bootcamp intended for the new iMac Pro
Then deleted the troublesome AMD folder just in case
Then ran Boot Camp 6.0 manually: “msiexec /i BootCamp-041-55643\BootCamp\Drivers\Apple\BootCamp.msi”
This worked perfectly on my iMac 7,1 (https://everymac.com/systems/apple/imac/specs/imac-core-2-duo-2.0-20-inch-aluminum-specs.html). When I checked the Intel and AMD drivers, they were already the latest versions and for the correct parts.
Surely a stupid question, please forgive me: To get an actual dual boot menu (w/o using the option key) on system startup one still needs bootcamp installed on whatever MacOS is running, I assume? After successful Windows 10 installation the only way to boot MacOS is the option key? Without doing that the iMac will start whichever OS that was last chosen by default, right? Thanks
Hello I have found that you can force install “the rest of boot camp” you still need to do the video driver modding stated above. Then download bootcamp 4.0.4033. copy the BootCamp folder out to you C:\ drive root. Navigate in to drivers fold inside you bootcamp folder and delete “ATI”. Next go into the apple folder right click on BootCamp64.msi and click “troubleshoot compatibility” the compatibility wizard will do its thing and finally conclude that the best thing to so is set it to skip windows version check. Click test the program, the setup will still refuse to start. Still click the option saying the settings worked. Now go to cmd and run it as administrator. Type “cd c:\BootCamp\Drivers\Apple” and press enter. Then type “msiexec /i BootCamp64.msi” the install will now run and install everything else besides the graphics and give you the Boot camp control panel!
Wow. That’s a great tip! Thanks!
Where i can download for a bluetooth driver ?
THX FOR THIS GREAT TUTORIAL
Hi you can use the Bluetooth Drivers from BootCamp i have first run AppleBluetoothEnablerInstaller64 and then the Broadcam Installer. The go via device manager. Change drivers -> search local -> Choose from list –>uncheck compatible hw –> Choose Apple Broadcom and apply. This enabled my Apple BT Keyboard as well.. Also please note that i used multiple USB Drives for the Win10 install but it never worked. So i bought a refurbished internal DVD and that fixed my issue.
Great info Stefan! Thanks for that.
Hi Joseph. You are a life saver. Thanks. However, i would like to extend my screen to a dtv but even though the catalyst pro control center identifies the 2nd monitor, i still cannot extend to it. Any pointers?
Hello. I own an iMac mid 2007 2.4 ghz, recently upgraded to 4 GB ram and installed OSx Mavericks 10.9.0 I’d like to install a Windows 7 Pro 64 bit, can I use your guide also for Windows 7 Pro? It’s the same? Thanks
I’m working on the same iMac you used: IMac mid 2007, where I clean installed El Capitan on SSD. I’m trying to follow your guide, but always stuck at DVD boot. My iMac won’t boot neither from “internal” superdrive”, nor using an external dvd-super-drive. Simply, the dvd is seen by El Capitan desktop, but is not showing as a boot option at iMac boot time, holding the “Option” key. I repeated successfully, many times, the oscdimg.exe command, and obtained always a iso image which results bootable by all windows disk-burning software. The burned DVD “NEVER” can boot on our iMac mid 2007.
I can’t understand why. Any suggestion, other than repeating the oscdimg procedure, which I did correctly many, many times?
Hi Giorgio, sorry for the late response. I don’t check my blog that much these days. This is weird and I cannot offer any explanation or solution. Maybe try an older version of windows 10 img. Don’t use the latest version. Use the version that was released circa the time that i wrote the blog maybe give that a try. it is a long shot though….
what if windows wont boot at all, i installed windows vista for my bros machine and realized he dosnt have the moniter for the machine so ive been keeping the machine for a long time, i just decided to install my imacs hdd into my mbp so i dont have to run off of usb and my vista drive for my bros machine in the imac, so far ive gotten to the boot up screen but it only lasts like maybe a second and it crashes, blue screens for not even a second, and reboots. any help here? also imac dosnt have dvd drive cuz it broke. my imac is a mid 2007 base model imac but the 3gb of ram.
I have windows 10 running perfectly on an Imac 2007 20″. The route I took was to install windows 7 as a Boot Camp option. Then I simply ran the Windows 10 upgrade downloaded from Microsoft and then run the download in Win 7. There was no issue with any drivers and I am happy to report my Flight Simulator X runs better than on Windows 7. To switch from Windows to Mac I go to the Boot Camp Icon , open the Boot camp Control panel and select start as a Macintosh. You can also hold down the ALT key during the boot and select windows or mac. Too easy.
Wow that is so great. Thanks for sharing that. I might try that one of these days!
First of all, thanks so much for this great guide, Joseph! I finally managed to install Windows 10 on my early 2008 24″ imac after months of struggling with bootcamp hacks and whatnot.
But I also have a plea for help: After updating Windows to version 1909 I have major problems with the display driver. The screen just freezes completely a few minutes after logging in. It happens even without pushing the display card in any way, sometimes just when I open a menu screen.
Now I couldn’t follow your guide for that part because the imac has a NVIDIA GeForce 8800 GS built in, so I first followed the instructions in Michael Aumeerally’s comment to install the Boot Camp drivers (Many thanks for that tip too!) but the issue persisted. Then I found official software from 2015 for that display card model on the NVIDIA website and installed that with driver signature enforcement turned off. Because it’s supposed to work with Win10 64-bit, I didn’t do any patching but it did show up correctly in display driver properties after installation. The freezes seem to come a bit later now than before but they still occur with seemingly random triggers. Please, if anyone has experienced something similar or can think of what the problem might be, I’d be very grateful for any kind of tip.
I was able to get bluetooth working with Bootcamp 4 and webcam working with Bootcamp 5 drivers. As for the GPU driver, the 2015 updates seems to be stable as mentioned above.
Wow. Simple brilliant. I have a iMac 8,1. I have only used the guide for the part with the graphics issue (because my windows 10 dvd works). Thank you so much.
Great however where can I download the apple drivers for this old imac? The windows update does not find the right driver. I need drivers for the speakers, for Bootcamp startup, and for the webcam.
I think Joseph has abandoned us! 🙂
I have the same mid 2017 iMac. But, the DVD Drive on it is broken (keeps ejecting any media you put into it). So, I used an external drive.
With this external drive, I can get an official printed Windows 10 DVD to show up as a boot option. But, when I try my burned copy, that I created using this OSCDIMG, it doesn’t show up as a bootable option.
However, this remastered DVD works fine to boot and start Windows 10 install on other PC’s.
I used DVD+R’s, Session At Once mode, and the InfraRecorder software. Should I try DVD-R ? Find software that can do Disk At Once ? Try “raw” mode ?
What an excellent tutorial!
I have installed Windows 10 sucessfully on a 24″ iMac, then scrubbed it out for Windows 11!
All went smoothly, except bit of trouble getting into Test mode for some reason.
buenas, tengo el imac 7.1, sinceramente no me animo a hacer el proceso ya que es la primera vez que uso imac y no entiendo mucho, pero me gustaria si alguien que quiera darme una mano puedo dejar mis redes sociales para que se contacten conmigo y me ayude durante el proceso! gracias
instagram @ivansanchez35
Thank you Joseph for helping me navigate this process. Of all the help I got from internet
Sources yours was the most valuable.
Is it possible to install Windows onto a blank disk? I mean without using any MacOS. Just creating the tweaked Win10 install-DVD and then proceed as if installing onto a PC. Without any Mac or EFI partition. (Btw, in this case do I have to make an EFI ora MBR install DVD?)
Is this method universal? i just discovered tiny windows 11 and would love to try it on a old imac i have installed windows 10 on with this guide. Just woundering if i can do the same thing just with a windows 11 iso.
Thank you, I successfully install windows 11 x-lite using this method on imac7,1.
hi,
I try to use this method but I get a problem getting a bootcamp drivers that can use as Apple now changed the package to make it more restrict. Any one can share the boot camp drivers old package that we can use? I see that WiFi never connects to 5g only 2.4 so I can’t get the correct driver also the sound does not work.
I try windows 10 but is lacking WiFi quality so no use.
Hello – I know this is a long time ago! Great instructions and I have exactly the same iMac. For whatever reason I can’t get it to boot the Windows Installer. I’ve tried various methods from so many tutorials. It doesn’t recognise a 32-bit EFI modified installer on either USB. My DVD using your method gets spat out by the drive. I’ve tried 32-bit Debian and the USB isn’t recognised at boot time (using Option key) – it’s just not there. If I use a standard Win 10 installer 64 bit (not modified) it shows up to be booted from but then it crashes straight away from apple boot option screen. Any more guidance? Is there a way to check I’ve modded the DVD right?
can’t wait to try this in 2024! Wish me luck!