Yet another XPEnology/DSM on HP N40L
What is XPEnology? To put this in layman’s term, XPEnology is simply an open source bootloader that allows one to run the Synology Disk Station Manager software (commonly referred to as the DSM) as a Network Attached Storage (NAS) using commonly available PC based hardware. The XPEnology approach is extremely popular to NAS owners and is highly regarded. I guess the main reason for the popularity is that while everyone wanted a good NAS, not everyone can afford a quality NAS setup such as the Qnap, Synology. The cost justification for these NAS boxes come down to good hardware with a good fault tolerant filesystem and a superb user interface. So for people who needs to justify spending every single penny they earn, suddenly a free open source solution such as the XPEnology becomes too good to resist. Don’t get me wrong. There are other open source solution such as FreeNAS, etc. They all have their places. It is not a competition here.
So what exactly is XPEnology again? There are professional people who could explain this better than I could:
I have been using XPEnology on one of my aging 8-years old Dell Vostro 1400 notebook for the past 2 years or so (if not more). The notebook/XPEnology combo serves mainly as my torrent box. I have been thinking of retiring this notebook and consolidating the torrent downloading business to one of my NAS boxes, and the HP N40L seems to fit the picture perfectly.
There are no shortage of posts and tutorials for anyone wishing to install XPEnology on the N40L. Google “XPEnology on bare metal installs” and you will find many youtube videos, forum and blog posts. What I find is that while the information are abundant, it is hard to find an easy to follow consolidated guide of doing things and as such it can be frustrating to search for a particular info which is buried in hundreds of forum posts.
I don’t claim my tutorial here will be anymore clearer than the forerunners before me. So the aim of this tutorial is basically to serve as a refresher course for myself and hopefully along the way this will help someone who is having trouble with the install.
Like I said, there are some good how-to guides already on the web:
- http://xpenology.org/installation/
- http://xpenology.me/category/how-to/
- https://xpenology.us/tutorials
- http://cyanlabs.net/tutorials/install-synology-dsm-5-0-4493-esxi-non-esxi/
- Google is your pal here.
But if you wish to see how I have done this, here goes. This assumes that you are running Windows in one of your boxes.
Ingredients
First we need to gather all the ingredients you will need:
1. A small USB thumb drive. I used an ultra small Sandisk Cruzer Fit USB 8GB drive. It is not USB3.0 but it does not need to be. No point in having the fastest USB 3.0 drive when this only serve as the boot drive. The good thing I like about the Cruzer Fit is that it does not run hot like the Sandisk Ultra Fit USB 3.0. So this is perfect as a permanent USB boot device.
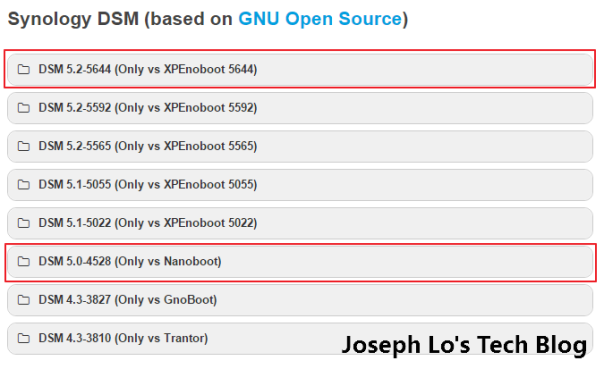
2. An XPEnology boot image. Essentially this is the bootloader software that is required to be installed onto the USB drive as a bootable OS. There are 2 variants of this bootloader. The Nanoboot and the XPEnoboot. I have used Nanoboot in the past with good results but it appears that XPEnoboot is the way forward as this support a newer version of DSM sofrware and contains more hardware drivers, useful if you have more exotic hardware than the rest of us. For instance, the latest version of nanoboot as of this writing supports DSM up to version 5.0-4528. The latest version of XPEnoboot support DSM up to v5.2-5644. See the following screenshot.
Here are more information on XPEnoboot.
To download the latest version of XPEnoboot, go to this webpage. http://xpenology.me/downloads/.
At first glance there are so many files listed and it can be overwhelming. Don’t fret. There are only a few files we actually need.
Download the IMG image of “XPEnoboot 5.2-5644.5 DS3615xs”. This is a 24MB file.
Note. You will see other formats of this XPEnoboot such as the ISO and VMDK format. You will not need the VMDK (Virtual Machine Disk) format unless you are trying to install this in a virtual machine such as VMWare or VirtualBox. You will not require the ISO format unless you are trying to boot XPEnology off a CD/DVD drive. I am of the opinion that CD/DVD drives are now considered legacy devices and also don’t have a CD/DVD drive attached to my HP N40L. So the only format that is relevant for me is the .IMG format. the .IMG format is the right format for burning the bootable image into a USB drive.
3. The Synology DSM software. This is the Synology Diskstation Manager Software that will be installed onto the NAS. The beauty of this DSM is that the interface has a window like interface and it is easy to navigate. The latest version of the DSM is v6.0 and is available if you know where to look BUT the current XPEnoboot does not yet support DSM v6 so please don’t try to install v6 yet. We will have to wait. So It is DSM 5.2 for now.
Download the PAT file as follows. This is a large download about 200MB or so.
There are also update files to this version that we will need later. So download the latest one.
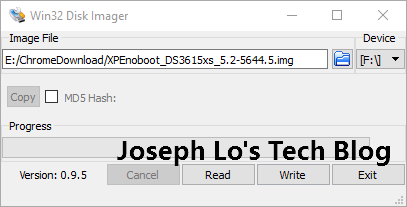
4. The Win32DiskImager software. This is required to write the XPEnoboot IMG file into USB drive and make it bootable. Download this here:
Install the software when it has been downloaded. On my windows 10 box, I have to run Win32DiskImager with admin rights otherwise it will not load.
5. The Synology Assistant software. This is the software that will search for all available Synology NAS’es connected to the same network. Very much like the Buffalo NASnavigator. The link on the site does not seem to work. So the only way to download this is from Synology itself. Download this here:
Download this and install the software. As part of the install, it will ask if we should trust the software from Synology. Hit the install button to proceed.
Installation
Now that all the ingredients are ready, we can make a start.
1. Create the bootable USB drive
Run Win32DiskImager, load the XPEnoboot IMG file previously downloaded and write it to the USB drive.
2. Boot XPEnoboot
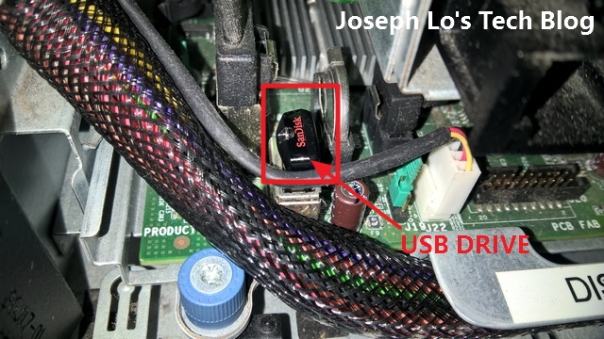
Now use the USB drive and plug into the USB port located on the motherboard of N40L.
The N40L is running headless so unless you plug a monitor to it, you won’t be able to see the boot up process. But this is not important as the actual Synology NAS also run headless. Let it boot for a minute and then load Synology Assistant that we have previously installed.
3. Start Synology Assistant.
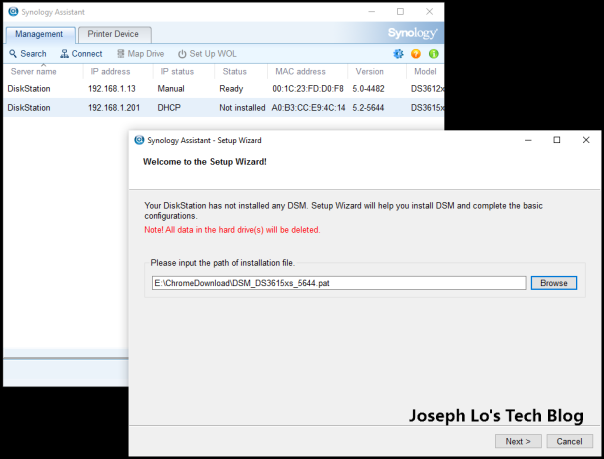
This will show a screen like so:
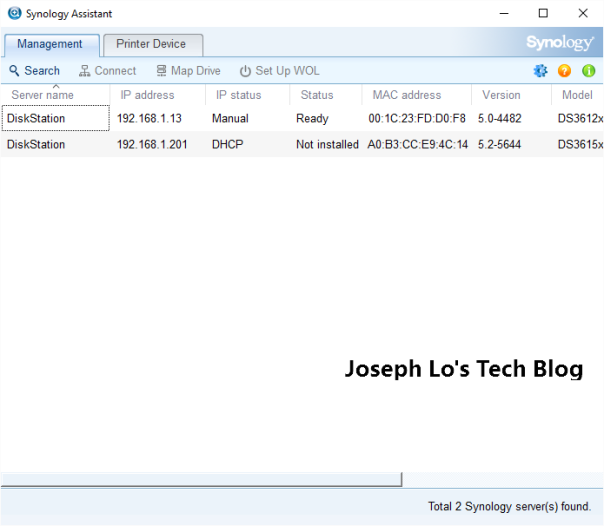
On the screenshot above, Synology Assistant found two DiskStation devices on the network. The first one is the XPEnology on my Dell notebook and the second one (where it says “Not installed”) is the XPEnoboot that we have just booted the HP N40L from.
4. Install DSM
Now we need to install the DSM software onto the N40L. This is quite easily done. With the Synology Assistant software running, right click on the selected DiskStation and select Install. Browse to the DSM file that we have downloaded earlier (the big 200MB .PAT file not the smaller one) and hit “Next”.
The server information dialog box will now show.
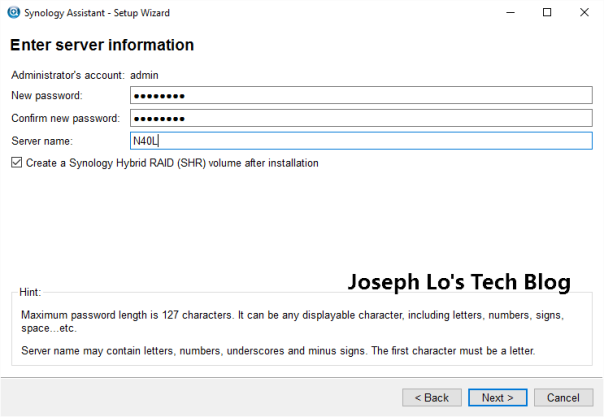
Enter the server name, password and hit the “Next” button. Don’t worry about the server name if you use the wrong one. You can always change this post-install. Another screen will now pop up asking if you want to create a new SHR volume. This will create a big SHR volume with a fault tolerance up to 1 disk failure. i.e. if one drive fails, all your data should still be intact and you can recover the data using the parity info on the remaining drives. Very much similar to the previous UnRAID setup I run on the N40L.
Next it will prompt for the network configuration like the following:
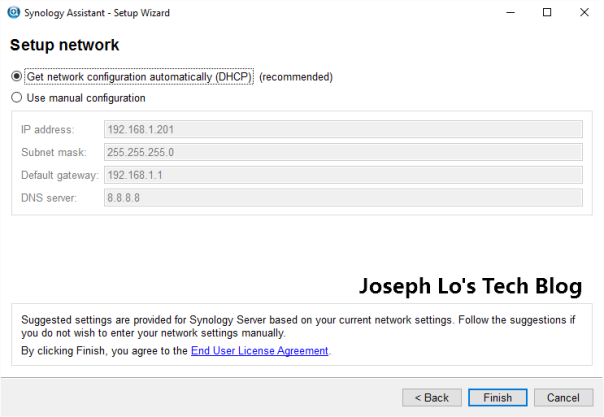
I suggest we select DHCP for now. We can always change this later. Click the “Finish” button.
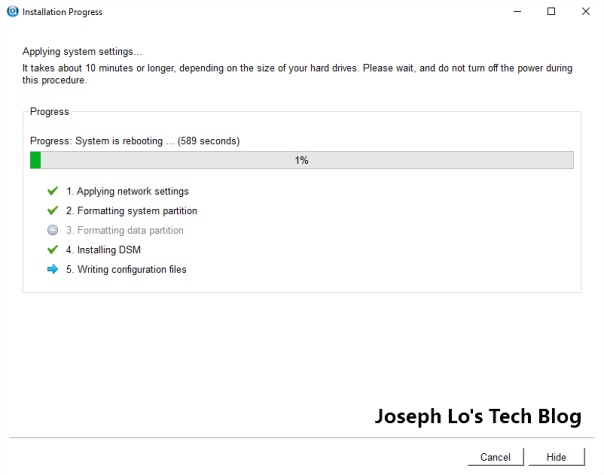
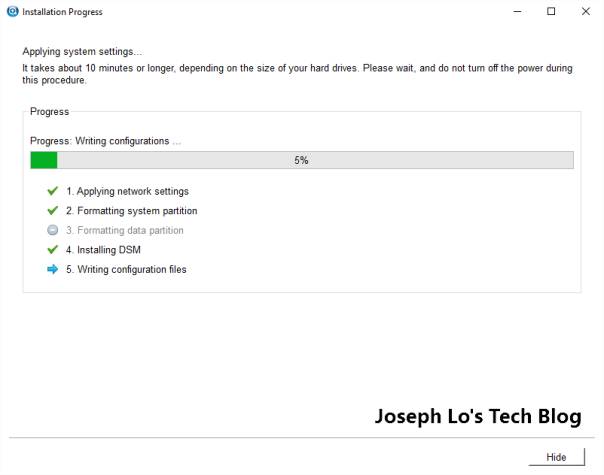
DSM will now be installed onto the hard drive and you will see a series of the progress like so:
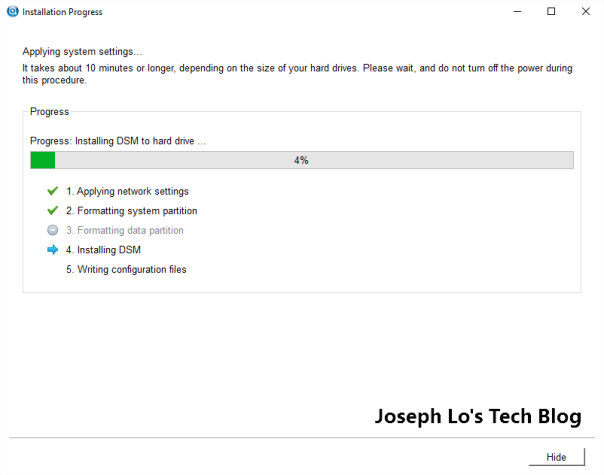
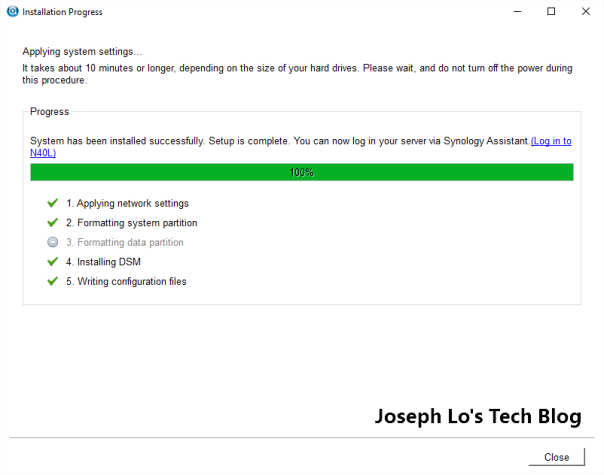
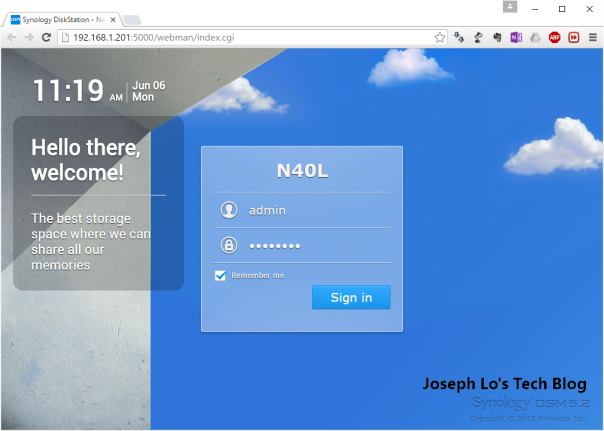
Once the installation is done, hit the link that says “Log in to N40L”. This will fire up the web browser and point this to the DSM’s web based interface like so:
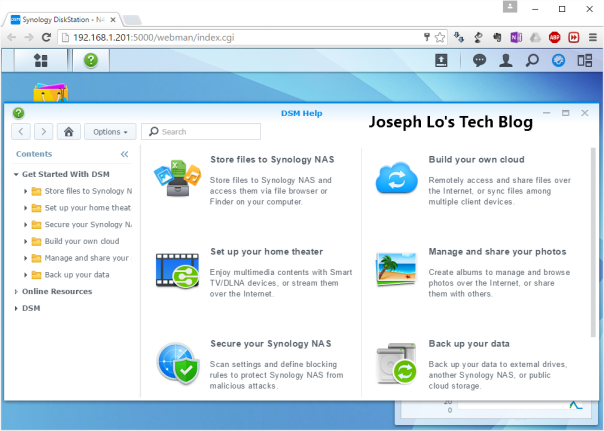
5. DSM configuration.
We can now login to DSM as Admin and use the password previously set. It will prompt for the installation of the latest version. Skip this for now by selecting “Download DSM updates and let me choose whether to install them”. Press the Finish button. This will now show the DSM in its glory and steps through some tips how to navigate the system.
First go to the Control Panel and click “Info Center”.
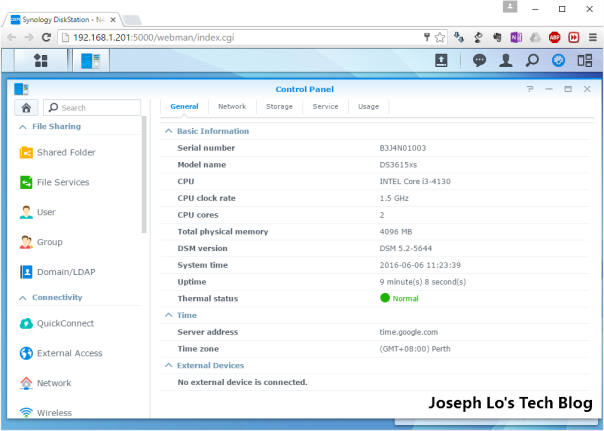
We can see that the DSM treated the HP N40L as a Synology DS365xs with an intel i3-4130 CPU running at 1.5 Ghz with 4GB of ram. The Synology DS365xs retails about AUD$2600. Don’t kid ourselves. We don’t have that kind of cash. Obviously the CPU info that is being reported is also incorrect as the N40L has an AMD dual core Turion II CPU running at 1.5 GHz. But this is not important.
Click the “Storage” tab and you will see all the disks that are currently installed.
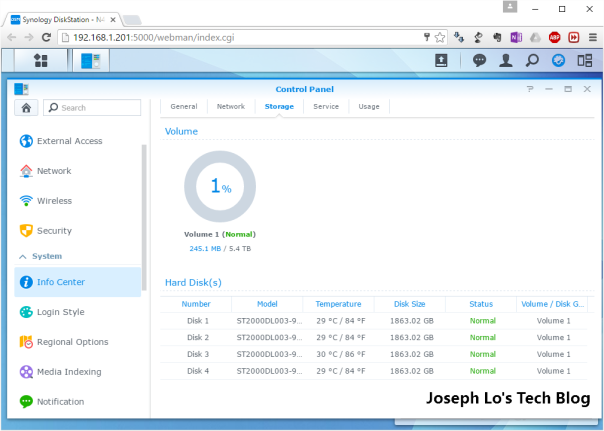
I have 4 x Seagate 2TB disks on this NAS. These disks are carried over from my other Buffalo linkstation Quad Pro NAS and have been running ok since day one.
Now exit the dialog box and this will take us back to the DSM desktop. Click the “Main Menu” icon to the top left. Select “Storage Manager”.
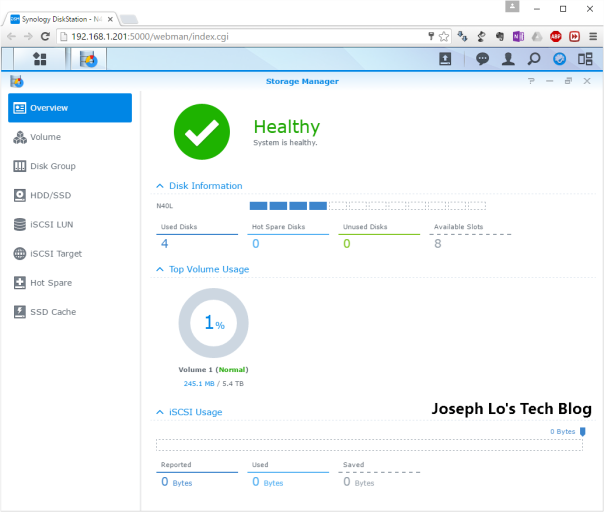
It can be observed that a 5.4TB volume 1 has been created. By default, Synology will create a Synology Hybrid RAID (SHR) volume rather than a classic Raid volume (Raid 5, 6, 10, etc). This is fine for my usage but you may want to learn about this more. Here is a good way to start:
SHR by default, is capable of tolerating the failure of 1 disk while maintaining the integrity of the data. This is akin to Raid 5. If better redundancy is required, SHR-2 can be implemented which can tolerate the failure of 2 disks. In this case this will be similar to a Raid 6 setup.
Whether SHR, SHR-2, or any of the classic RAID configurations are used, there are implications on the storage that is made available. Synology has a good raid calculator that seems to illustrate this point very well. See this link here:
https://www.synology.com/en-global/support/RAID_calculator

The above screenshot shows the storage space available had the disks are configured for a SHR volume or a SHR-2 volume. So with 4 x 2TB drives, standard SHR will give 6TB of available space and 2TB used for protection. SHR-2 will yield 4TB of space and the other 4TB used for protection.
My personal opinion is that if the NAS is not meant to be serving critical mission critical files, SHR will do just fine. Ok. So in my case I have 5.4TB of useable space.
As a side note, be aware that when you have a 2TB drive, you don’t exactly have 2TB of storage. The nett useable space will be somewhat like 1.8TB or so. So be mindful if you are planning your NAS setup and storage needs.
6. Setting up a volume for file sharing.
The storage is now setup but we can’t get to the volume yet. We need to first setup the share.
Go to Control Panel, select the “Shared Folder”. Click the “Create” button.
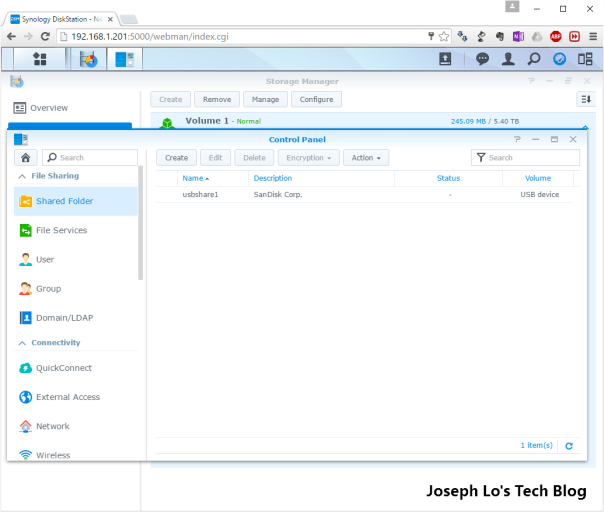
Give it a shared name. I called mine “drivepool”.
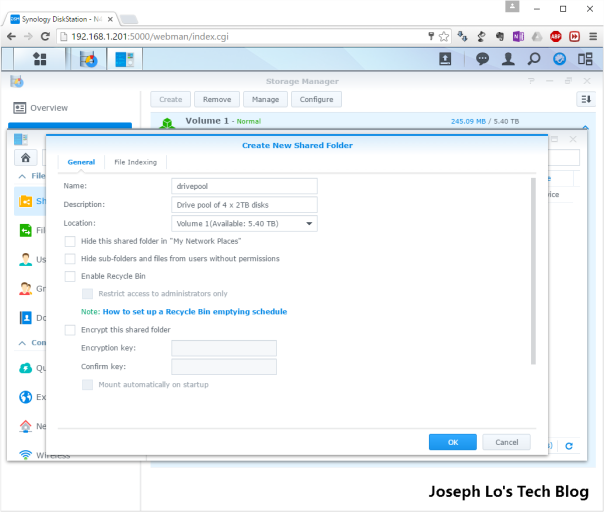
Click the OK button and this will bring us to the access permissions page.
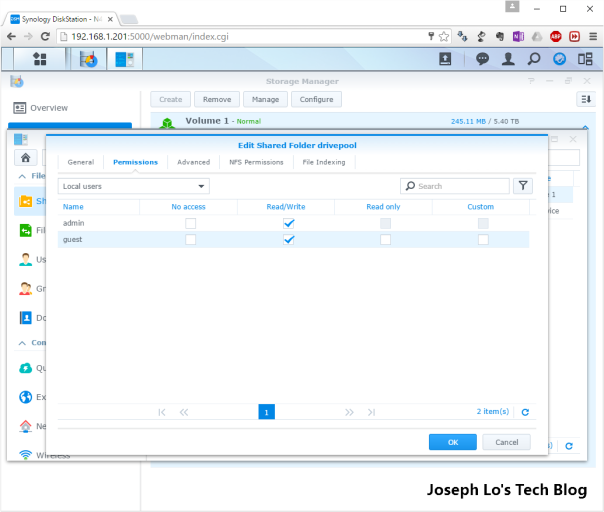
I just select read/write on both admin and guests. If you need better security, you can define users and individual access rights. This is just meant to be a media server. So I won’t bother.
Once this is done, the volume will now be accessible by any computer who can see the NAS.
7. Updating DSM
Now we can proceed to update DSM to the latest version.
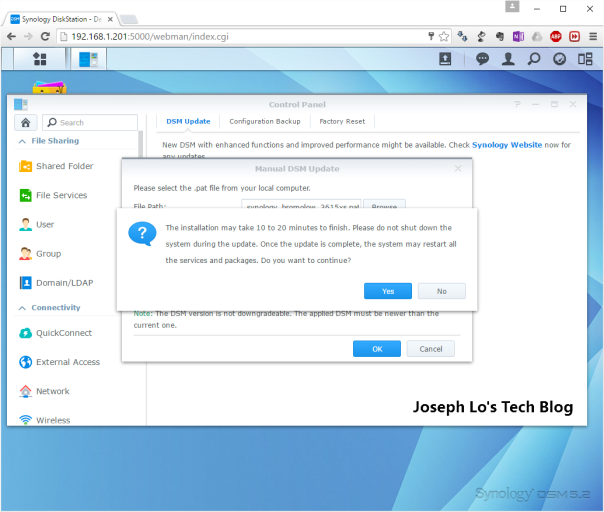
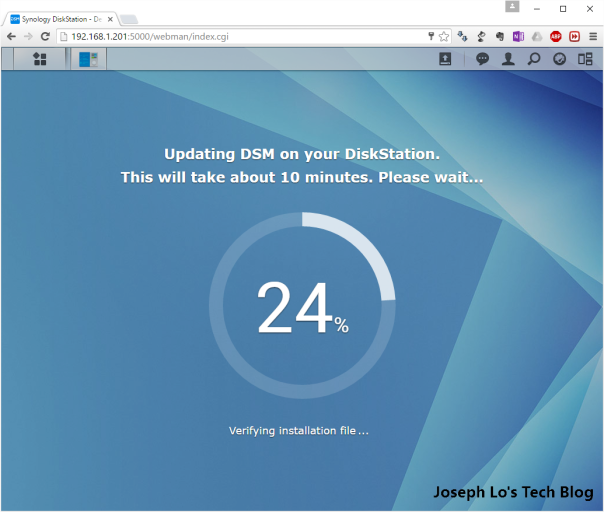
Go to control panel. Click on “Update and Restore”. Then click “Manual DSM Update”. Then browse to the folder where the DSM update file is located.
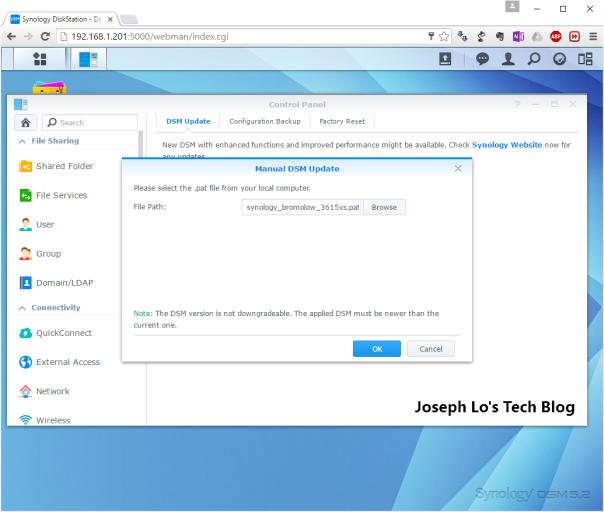
The process from hereon is fully automatic. XPEnology will now be upgraded and restarted.

You will now see that the version of the DSM is now DSM 5.2-5644 Update 5. It also says that DSM 6.0 is available for download. A word of caution. Don’t do the upgrade until such time that DSM 6.0 is fully compatible with XPEnology.
8. Some minor tweakings
I leave the NAS box pretty much the way it is except of the following minor tweaks:
- Stop DSM from launching the DSM help dialog box. At the DSM help dialog box, go to options. And click “Do not automatically launch DSM help at every login”.
- Setting IP addresses. I prefer to set my NAS boxes to its own static address.
- Disable DSM auto update. I go to task scheduler and unclick “DSM auto update”.
- Change the login style to the black theme. I also disable the welcome title and welcome message to give a more minimalist look.
- Setting up packages such as Download Manager, Cloud Sync, Antivirus Essential.
So there we have it. A fully functional “Synology” NAS at the fraction of the cost. Hopefully this guide is useful.
Happy NAS’ing 🙂
Posted on June 6, 2016, in Hardware, HP Microserver N40L, Uncategorized and tagged Disk Station Manager, DSM, HP Microserver N40L, N40L, Nanoboot, Synology, XPEnoboot, XPEnology. Bookmark the permalink. 30 Comments.

Thank you very much, it helped me out a lot. Best wishes.
Hi, followed the instructions and they are GREAT! I do have a question though, I installed the MOD BIOS and have a 5th drive running from the internal SATA – can this be included in the drive pool?
Yep. The 5th drive can be added to the drivepool
It doesn’t seem to show as an available hdd, doesn’t seem to know it’s there. I will check the BIOS settings and restart.
While I did used a MOD BIOS it wasn’t the right one, followed your other guide and the HDD now shows and is being added to the pool.
Cheers
Glad this works out well for you
Thank you for taking your time to do this tutorial. This is probablly the best explantion i have come across since i started trying out xpenology. I have s small problem though, i’am getting this error when i try installing the .pat file. “You have to use an installation file with 5644 or above version” yet am using the one recommended above. Please assist.
Finally.. had install.. but one more thing please. Is it possible to register with my synology account..need to enable QuickConnect account. Am getting unknown error when i try connecting..
Good stuff. Glad you got this going. I have not tried to login to the synology account. U might be able to get some traction by following this post: http://xpenology.com/forum/viewtopic.php?f=2&t=9700. Hope this helps.
Amazing guide. Worked out perfectly on my N54L. You sir, are a legend. Also don’t need to connect straight to USB on mobo, external USB port is fine
Happy this works well for you
Has anybody got their unit going into hibernation after a period of inactivity? If so, settings please.
Good question. I have tried but not successful. Although I must say I have not tried very hard
My N40L will enter hibernation OK and that is running Windows 10. I am struggling with this N36L / DSM 5.2
Great instruction, many thanks.
May I know if the USB drive should be removed after the DSM installed…. or it should be placed in the machine all the time?
You can remove the usb drive once the box is booted into dsm but i leave it connected all the time
Thanks for your great tutorials.
I saw you used the version 5.2-5644 as an example… do you know if I can follow your steps but using the version 5.2-5967?
Also, there is “DSM 6.0.2 loader” from XPEnology but I have hard time to follow their instruction. Is DSM 6.0 ready for XPenology?
Thanks again.
There is only one way to find out 🙂 try it out and see. Does not hurt. I have not tried dsm 6 yet
Unreal! I am so happy with my box and this guide.
Thank you!
Great writeup, thanks! To those looking to go to 6.0.2 I can give a thumbs up. I followed the instructions on Xpenology.com and it worked great. Remember that the N40L uses an AMD processor and it’ll be easier for you than it was for me 😀
What is the maximum supported capacity of hdd for N40L? thanks
Thank you so much for this guide. It worked brilliantly for me on a HP N36L.
Hi Joseph, I have two questions:
I have two N40L’s running already on DS4.2.
1. Upgrading to 5.2 doesn’t work for me, keep getting errors when processing the PAT. So can I do a complete reinstall by running through your steps, getting the 5.2 (most probably will work). But will the 5.2 automatically accept my 4 HDD’s already inplace? These 4 HDD’s we’re configured with the 4.2. I don’t want to loose data on these HDD’s.
2. Furthermore I have problems running both of the N40L’s at the same time on the network. You can only acces one at a time. Is there a setting within the DSM configuration that I can alter so both of the N40L’s will run both on the network without connection problems?
Hope you have some usefull tips for me.
Thanks!
Berry
Hi Berry. Unfortunately I don’t have direct experience of accessing HDDs previously setup via 4.2 although I am thinking this should not matter as the file system remains the same across versions. However, I cannot be absolutely certain.
As for u unable to access both N40L at any one time, I am thinking your IP address somehow clashes with one another. Perhaps check your router to see what IP addresses the N40L is using. Best to set static IP.
Good luck!
Joseph
Has any one else experienced a HDD failure? I did in a way, the BIOS lost its settings so the 5th HDD didn’t appear. I originally thought the HDD had died and wiped it during testing, while it was out the files were still there on the N36L but I noticed quite a few are corrupted. Inserting the HDD back, it rebuilt itself and did error checks but the data is still corrupt. Not all my media is corrupt, its rather random actually. It has left me wondering if this set up can really handle a HDD failure though.
Curious, has anyone run into the issue with the onboard sata port being detected after installing xpenoboot ?
the 4 main bays are working fine … but the 5th sata port (on the motherboard) is no longer detected by the bios …. it worked perfectly in windows and linux …
I had to install the special Bios, after which you change settings in 2 different menus in order for it to be seen. Windows and Linux don’t need these special settings. Sorry I can’t post the screen shots but am on a mobile.
Thanks for this very handy writeup. I had problems using the instructions onthe main xpenology site for DSM6, which I need to spend more time on, but the instructions here got me up and running with 5 in no time at all 🙂
Glad you find this helpful. 🙂
Any tips for upgrading to 6.0.2? (I understand getting the N40L working with the current 6.2.2 would be more difficult.)