Yet Another NAS – HP Microserver N40L – unRAID setup
Edited. Follow up article to this post – Yet Another NAS – HP Microserver N40L – Adding 5th hard drive and Installing a modded firmware
So my HP Microserver N40L arrived a week ago and now I bought 2 x Western Digital 3TB Red Drives for it. I paid A$169 for each of these drives.

I also bought a Sandisk Cruzer Fit 8GB drive for A$9.56 from Officeworks. The Cruzer fit USB drive is really tiny, just like a logitech unifying receiver. I love it.

What I think of the HP Microserver
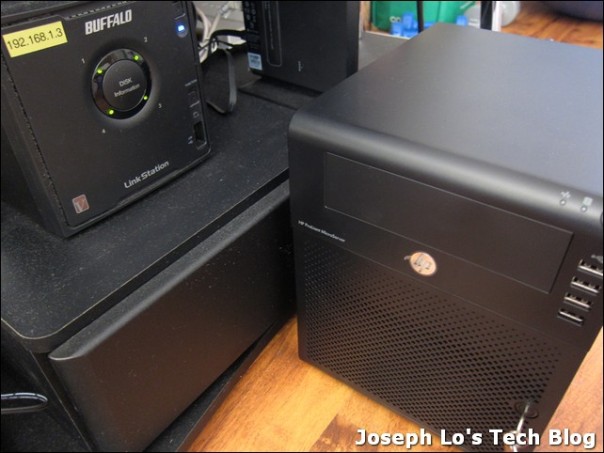
First of all, this is a lot bigger and heavier than my Buffalo Quad Pro. I didn’t quite expect this to be the case as this is afterall a 4 disks NAS (although u could probably squeeze 6 drives into it if you did not install a DVD drive). Here is a picture that shows the size difference between the two.
Build quality is very good. All the parts appear to be very solidly built. I am particular happy that there are ample USB ports available and that the drive bays have a door which can be locked. The fan is a tad noisy (but not too bad) and draws a fair bit of air into the case to cool the hard drives. It looks to be a reliable NAS.

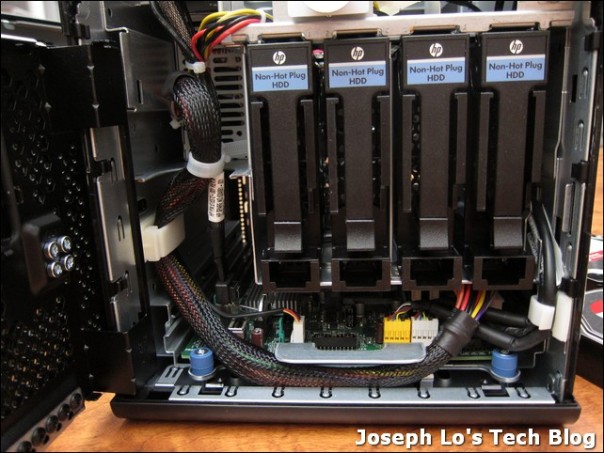
In addition to an optical drive bay and a smaller 3.5″ internal drive bay, it has 4 more hard drive bays. They are not hot-swap types but this does not worry me. I don’t need hot swap features on a home NAS. The motherboard is below the hard drives. Looks a bit tight in that space but I believe this should be fine, given that the CPU is a low powered Turion II chip.
The Microserver can accommodate 2 low profile/half height expansion cards and have 2 more USB ports at the back of the casing. It also has a standard VGA port which is handy.

Build a NAS or Buy the Microserver
This is a very subjective question and answer is never straightforward. If there is a need for more than 4 or 5 hard drives, then building a NAS using a good quality casing (such as the Lian Li PC-Q18) and a rock solid 80plus power supply is the way to go. If the need is more modest, then I think one cannot go wrong with buying the Microserver N40L. The price I paid for the NAS is about $220ish. I will find it extremely challenging to build a NAS of the same functionality and form factor that cost the same.
What the Microserver can be used for
Many people just use the microserver as a NAS. Other more adventurous type mod the NAS into a NAS plus media centre with PVR recording ability. Others go one step further and make this box runs also as a torrent/download box.
As the microserver is effectively a PC running inside a NAS formfactor, there are lots of possibilities to install whatever OS one can think of; from windows to linux to specialized distro such as FreeNAS , unRAID and OpenELEC. The sky is the limit to what one can do to this NAS. This is perhaps the biggest strength I see between the HP Microserver and my trusty Buffalo Quad Pro.
But that being said, a line has to be drawn to what exactly is the main purpose of this device. It has a low powered CPU. It is not intending to replace a HTPC (although it can work in that capacity). So it is wise in my opinion to limit the kind of stuff that will be running on the NAS.
What I used the Microserver for
I am a lot less complicated than some would think. I will just run this Microsever as a simple NAS. I don’t intend to muck around with hardware modding and the like. I don’t intend to run a full OS such as Ubuntu or Windows 7 or even Windows Home Server 2011 (WHS2011) on the NAS. And because I wanted something very simple (yet robust), not many options come to mind:
FreeNAS – I used to run FreeNAS in the early days (at least 5 years ago) but I have since lost touch with the distro. The latest v8 appears to need 4GB of ram to start with (6GB is recommended to run with the ZFS filesystem). The microserver comes with only 2GB of ECC ram. ECC ram typically cost more than normal ram. I wouldn’t bother upgrading. So I skipped FreeNAS.
FlexRAID – I have heard some very good things about FlexRAID and it seems a very capable system indeed. But it runs on top of Windows or Linux. I prefer a standalone distro that does everything. So I decided I should pass at this stage. I am still interested and I may come back to using FlexRAID in future.
SnapRAID – This seems to be an opensource version of an unRAID equivalent but as it is still very much relying on a command line interface, and plus it has to run on top of windows/linux as well. It has potential but I will pass at this stage.
OpenMediaVault – This is a lesser known NAS solution which is based on debian. Looks like it has potential. I will keep this in mind.
unRAID – This seems to be the only distro left that fulfills my requirement. It is simple, run on a USB drive so it does not take up any hard drive space, is standalone and does not require linux/windows to be installed first, support parity drive for a more robust RAID volume, has a basic free version that allows up to 1 parity drive + 2 data drives, support some useful addons/3rd party packages, have many loyal users vouching for it, have an active forum in many places, what’s not to like?
Internet References for Setting up unRAID
There are no lack of resources on using unRAID on the internet. In my opinion, among the more useful ones (in no particular order) are:
- Lime Technology – unRAID Server Installation
- Lime Technology – unRAID Manual
- Lime Technology – Configuration_Tutorial
- Setting up an UnRaid Server – Step by Step from a newbies standpoint.
- Media Smart Server – Guide: unRAID Server – Part 1 The Journey to unRAID/
- Media Smart Server – Guide: unRAID Server – Part 2 Installing unRAID
- Media Smart Server – Guide: unRAID Server – Part 3 Configuring and Using unRAID
- The Gear Sphere – How to install unRAID (part 1)
- The Gear Sphere – How to install unRAID (part 2)
There are obviously a lot more other unRAID tutorials/guides on the internet. And because there are already so many of these guides on the same subject, there is very little value in me reinventing the wheel and repeating what others have already done. Instead, I will focus on my experience and issues faced with installing the unRAID server.
Initial Setting up unRAID
Setting up unRAID can be tricky at times so the above references come in handy. Be prepared to have a bit of trial and errors as well. Some of the guides are still focused on unRAID v4.7. The latest version is v5.0-rc11. I have tried both v4.7 and v5 and find that I prefer the user interface of v5 a lot better than v4.7.
Configuration of unRAID is largely web driven. These are the various bits and pieces that I fine tune.
1. Set Server Name
The default server name for the NAS is “Tower”. Not sure how that name comes about. So I rename this to something more meaningful to me.
2. Date and Time
Make sure that time zone is set correctly and it is also preferable to select a time server of low latency. In my case, I use au.pool.ntp.org. So google for the best ntp server would be the best bet.

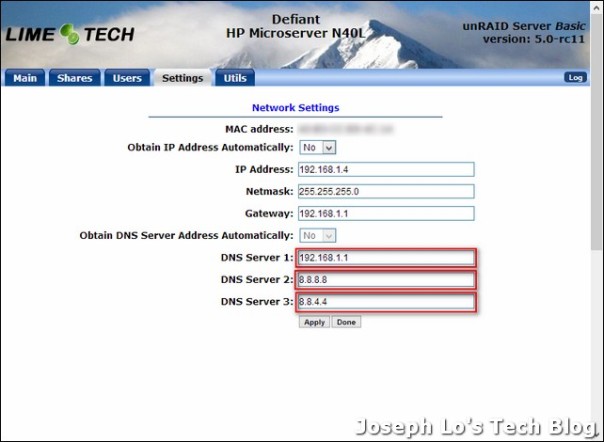
3. Network Settings
By default, unRAID is setup to obtain the IP address automatically from a DHCP server on the network. In most cases, this would be the router in the house. I prefer to set the IP address to a static address. I also set the DNS server accordingly. Here are my settings. I also include google’s public DNS servers into the list. This is obviously optional.
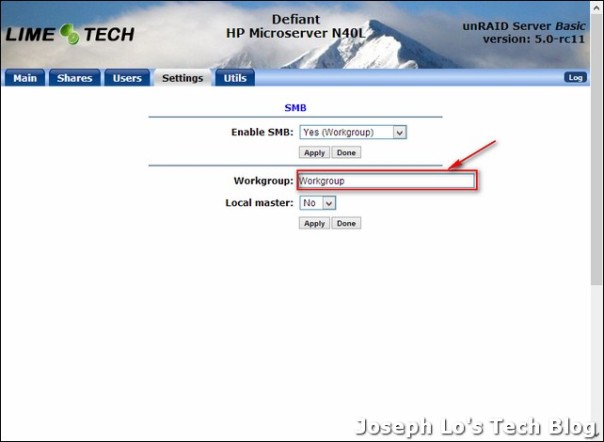
4.SMB
Make sure that the workgroup name reflect the exact name as the existing network. I changed this to “Workgroup” to match my existing boxes.
5. Share Settings
This is an important setting and the “Enable User Shares” must be set to Yes before we can define shares.

Issues and Problems Encountered
1. Pre-clearing Time
1. Lime Technology recommends that all the drives are first pre-cleared before setting up RAID using these drives. I did just that. But the process of pre-clearing a drive is painfully slow. It takes almost exactly 38 hours in my case. This is only a problem because I am less patient than others.
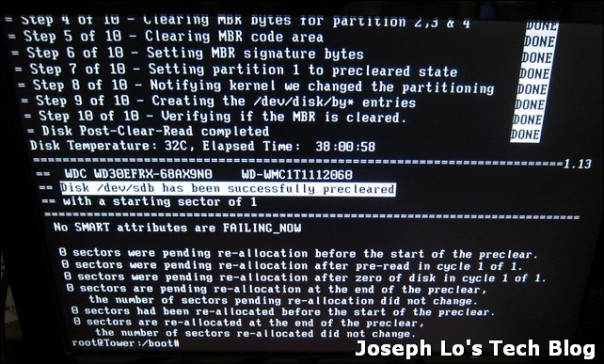
Even though the process takes a long time, I would still highly recommend that this pre-clearing process be carried out. To me, it is one way to “stress test” the new disks as the pre-clearing routine basically read and write to the hard drive constantly. If there are issues with the hard drives, this should at least (hopefully) be evident during the pre-clearing process.
Here are some useful information re. the Pre-clearing process
Lime Technology – preclear_disk.sh – a new utility to burn-in and pre-clear disks for quick add
2. Unable to Create a Share
When the pre-clear is completed and a RAID array is setup using the drives, I take it for granted that there are no filesystem errors on the drive, especially when the user interface did not report something untoward. It says the Parity is valid and there are zero errors. I didn’t think too much about it. I was wrong.
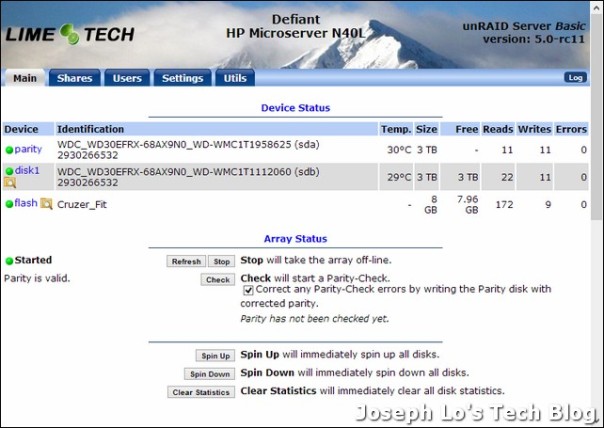
Apparently there was a filesystem error that causes the drives to be set to read-only mode. And because I run the microserver headless and I did not inspect the log file enough, I didn’t realize this issue.
So when I proceed to create a share which look something like this, the settings never “stick” and after I hit the “Add Share” button, unRAID didn’t create the share.
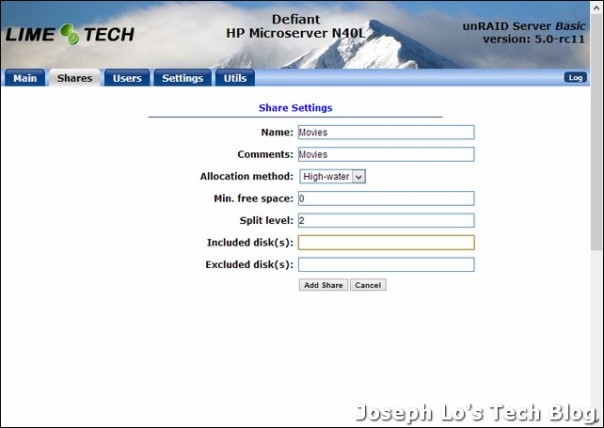
Its like it has suffered a short term memory loss of some sort. The “User Shares” page remains empty no matter how many times I tried.

It is only after I realize that there was a filesystem error that I finally understand what actually happened. The drives are set to read-only mode and hence there is no way we can create a directory. Hence the share failure. It will be good if there are error messages of some sort that are reported through the user interface. Who knows, maybe this will get implemented in the next release….
The fix to this is fortunately not too difficult. Here is the article that helped me a lot.
Lime Technology – Check_Disk_Filesystems
First I run the command:
reiserfsck --check /dev/md1
and this returned a console screen that looks like this. I can now see that there are 2 filesystem errors.

To fix the error, I run
reiserfsck --fix-fixable /dev/md1
and when this is completed, it showed the following:
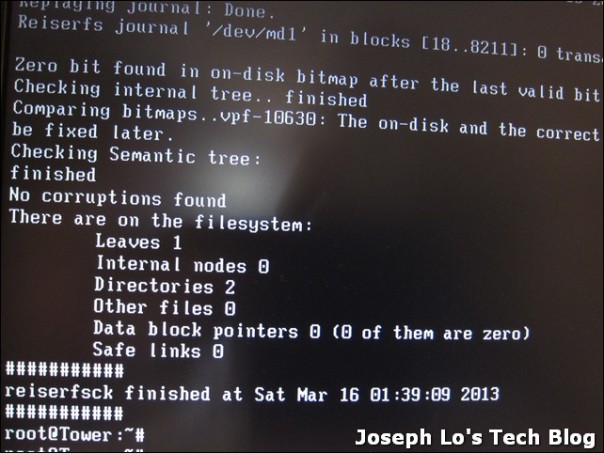
And this fixed the share issue that I have been having. I am happy again.
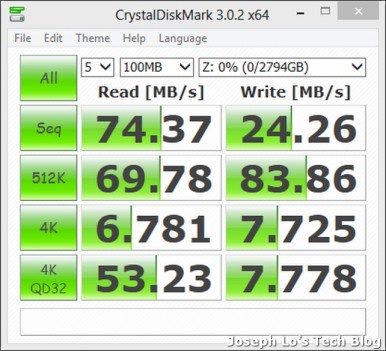
Benchmark
It is a fact. Men like to compare with one another. From houses to cars to Hifi to computers. The show factor is to see whose stick is longer and bigger. That’s why benchmark cpu test, hard drive test, etc are proliferated over the internet. That being said, this is yet another benchmark test of the microserver. I usually only do the 100MB file transfer test. Here is my results. I find that the NAS is faster than my Quad Pro and I think the stronger Turion II 1.5GHz cpu gives the edge over the much slower Marvell 1.6GHz cpu on the Buffalo Quad Pro.
Parting Remarks
That’s all for this post. I will describe the addons and plugins I installed for the MicroServer N40L in the next few posts.
I have only been using the Microserver for about 2 weeks or so. But so far the experience is quite positive.
Thanks for reading. Happy NAS’ing.
Posted on March 17, 2013, in HP Microserver N40L and tagged HP Microserver N40L, NAS, server, unraid. Bookmark the permalink. 6 Comments.

Hi,
Great article. However, I would like to add something: the Microserver does indeed come with screws for the drives. In fact, they are visible in one of your pictures– the screws are on the interior side of the front door. 🙂
Hi there. Yes. You are indeed correct! There are only 4 screws however. It will be better if HP can bundle more screws on the front door 🙂
Hi,
Not the silver screws, the black ones! They are all in a line at the bottom of the door!
Great article!
Hi. You are absolutely right! I feel like an idiot now 🙂 hahahaha…
great article , it was the right information at the right time.. Off to get some WD RED for my HP.
That’s funny about the screw. I had the same issue with my box. I pulled the box apart putting the door aside and then had to find screws to use. When I finally got it all together and put the door back on I found the screws. Didn’t I feel like the fool 🙂